TallyPrime Dashboard
the most modern part of the software: the TallyPrime Dashboard. This feature is a game-changer for business owners because it turns dense accounting rows into visual stories.
To help you organize this for your guide, I’ve broken down the “End-to-End” information into four logical pillars: Visibility, Customization, Accessibility, and Security.
1. The Bird’s-Eye View: What is the Dashboard?
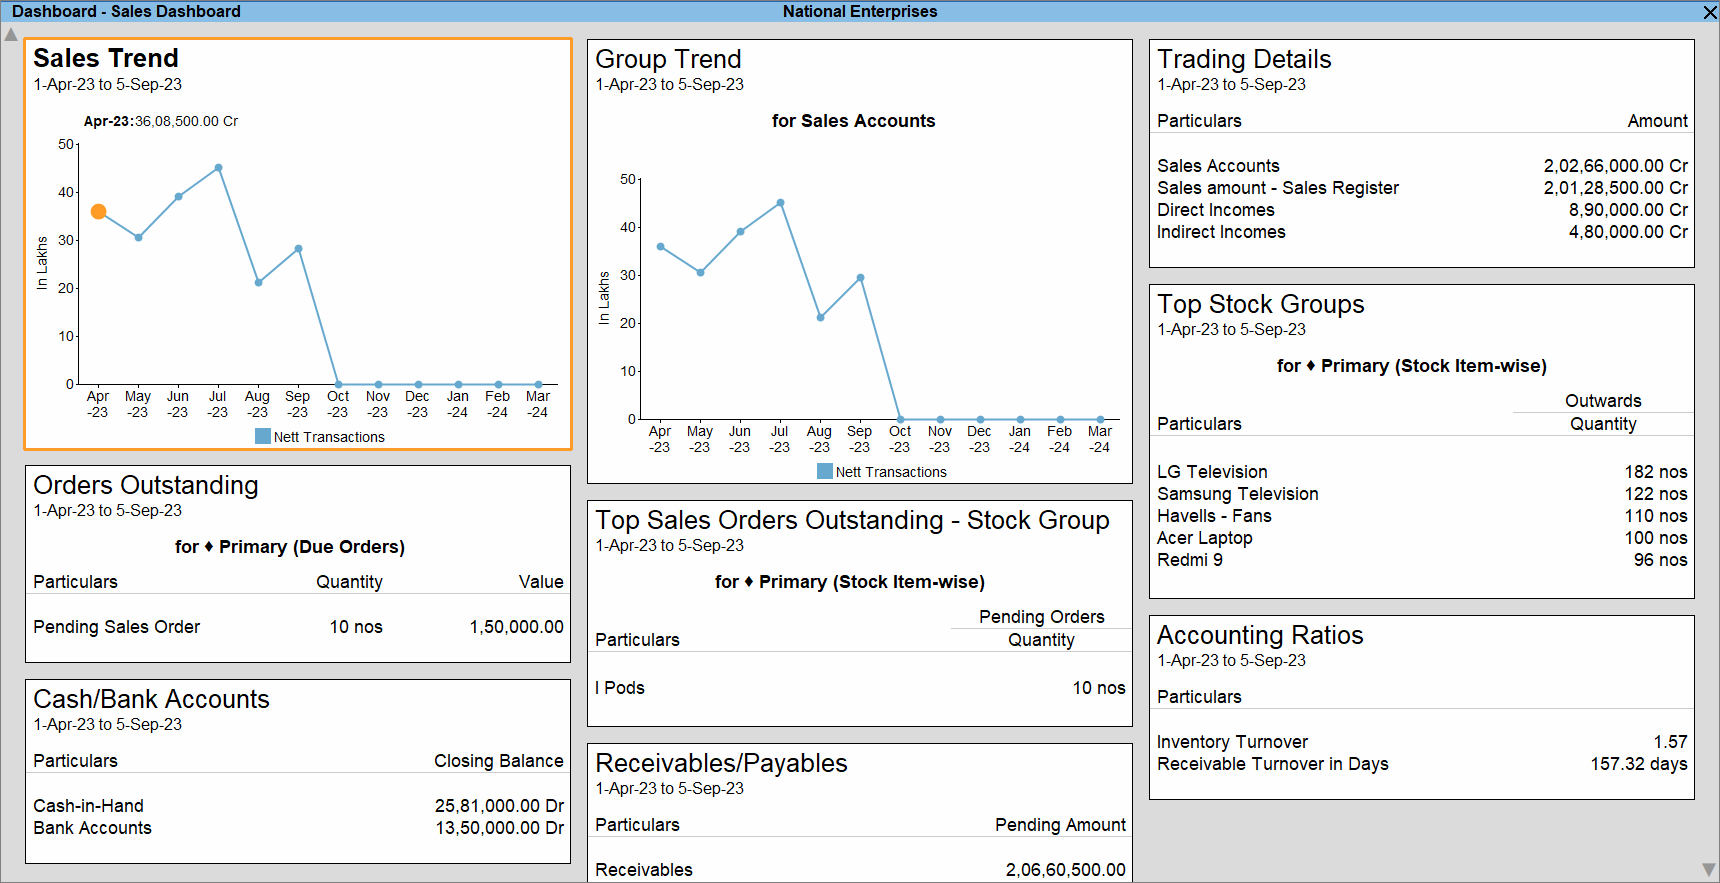
The Dashboard is a central monitoring hub that pulls data from over 350 reports. Instead of opening 10 different screens, you see a single interface with “Tiles” representing:
-
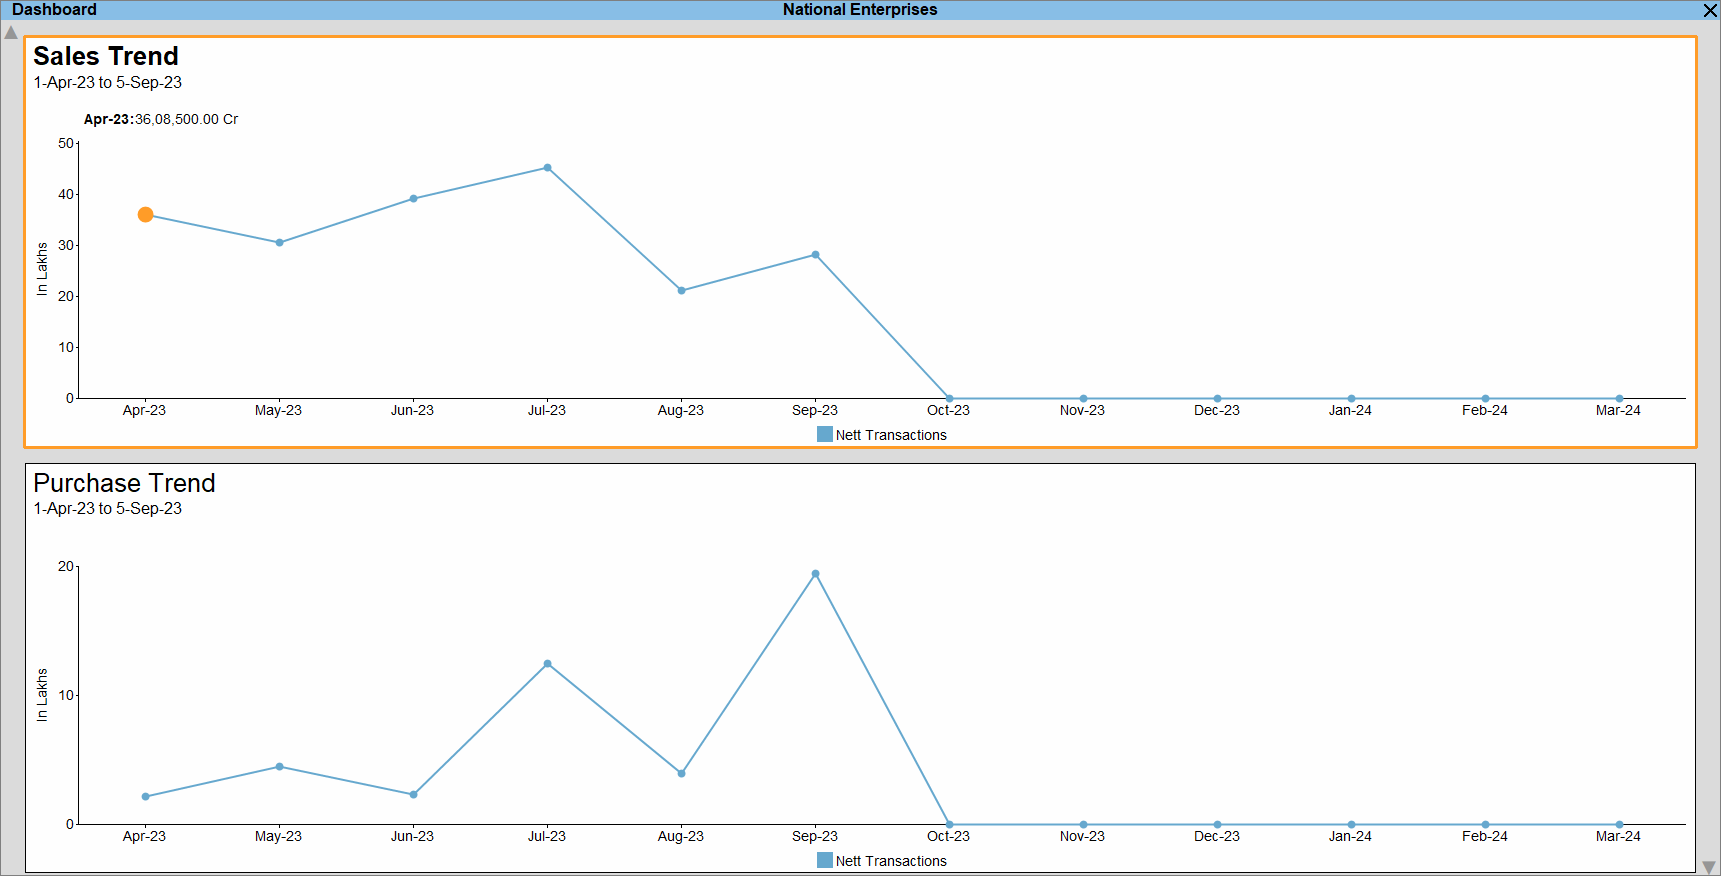
Sales & Purchase Trends (Bar/Line Graphs)
-
Asset & Liability (Balance Sheet Overview)
-
Cash Inflow & Outflow (Liquidity tracking)
-
Trading Details (Profitability)
2. Flexibility & Configuration
You aren’t stuck with the default view. TallyPrime allows you to “build” your own experience:
-
Add/Remove Tiles: Tailor the screen to show only what matters to your specific role.
-
Visual Toggle: Choose to see Data only, Graph only, or Both within a single tile.
-
Tile Orientation: Arrange tiles horizontally or vertically to fit your monitor size.
-
Expansion: If you need to focus on one specific area (like “Stock Position”), you can Expand that single tile to fill the screen.
3. Setting the Home Screen
For many business owners, the Dashboard is the business. You can configure TallyPrime to load the Dashboard as the Home Screen automatically whenever a company is loaded.
Path: F1: Help > Settings > Startup > Set Dashboard as Home Screen.
4. Security & User Control
Because the Dashboard contains sensitive data (like Net Profit or Bank Balances), TallyPrime allows for strict Security Control:
-
Restrict Users: You can prevent specific staff members from seeing certain tiles.
-
Role-Based Access: A salesperson might see the “Sales Trend” tile, while the “Cash Flow” and “Net Profit” tiles remain hidden from them.
- Press Alt+G (Go To) > type or select Dashboard and press Enter.
Alternatively, Gateway of Tally> Dashboard.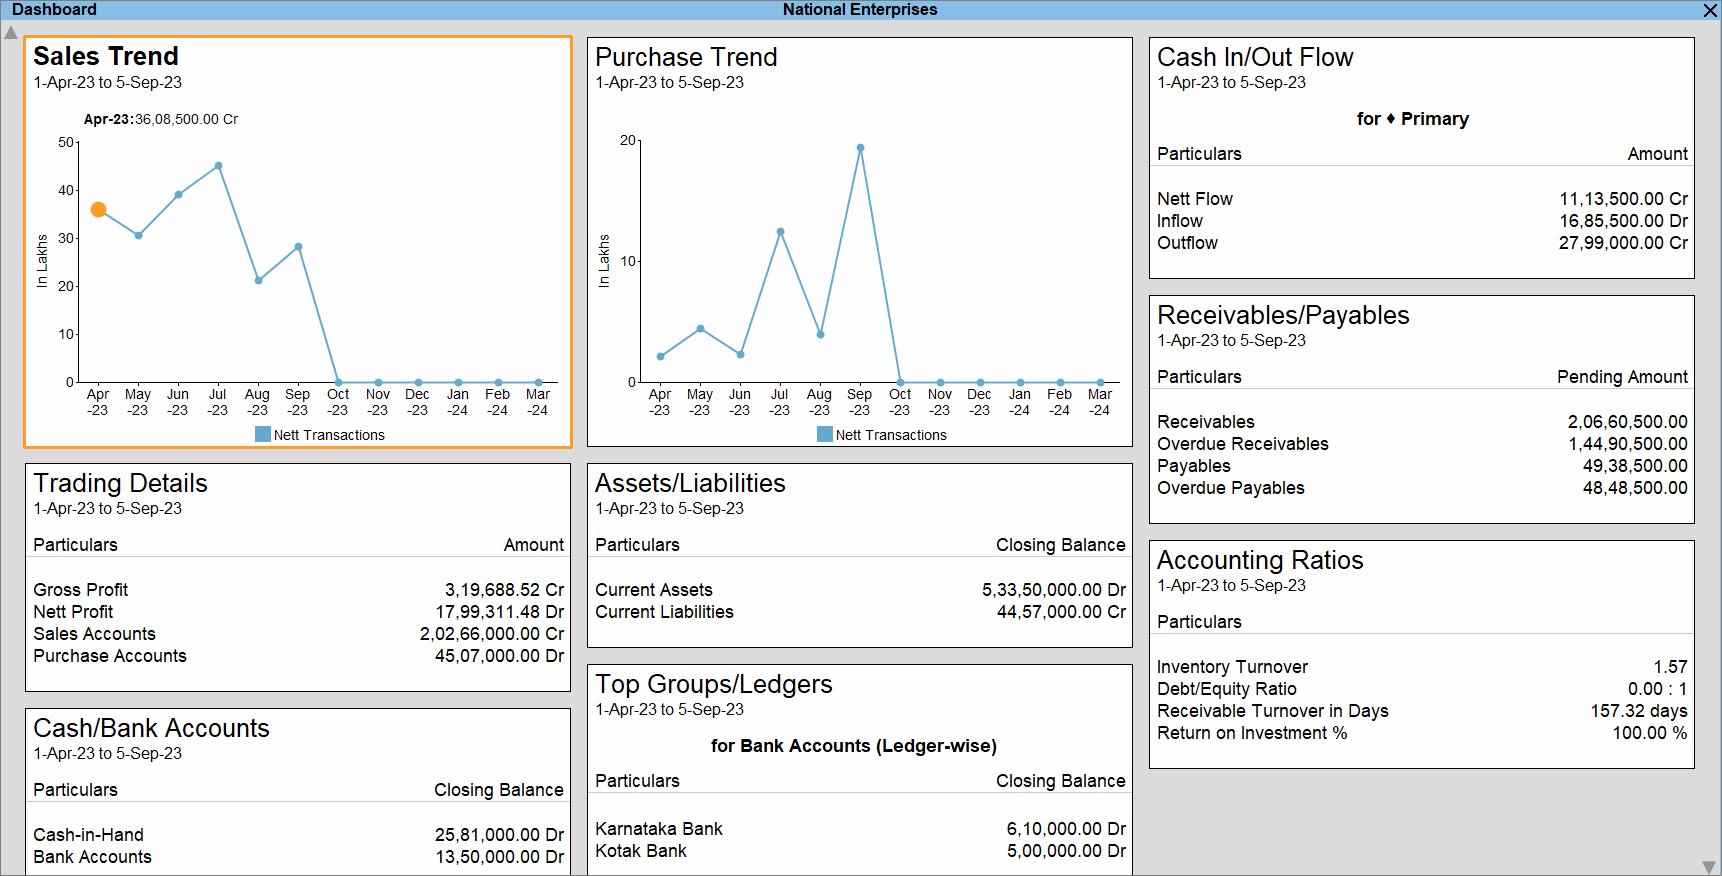
- Change Period for the Dashboard.
- Press Ctrl+F2 (Period).
- Enter the From and To dates and press Enter.
The Period of the entire Dashboard gets changed.
- Change Period for a specific tile.
- Select the tile for which you want to change the Period.
- Press F2 (Period).
- Enter the From and To dates and press Enter.
The Period of the selected tile gets changed.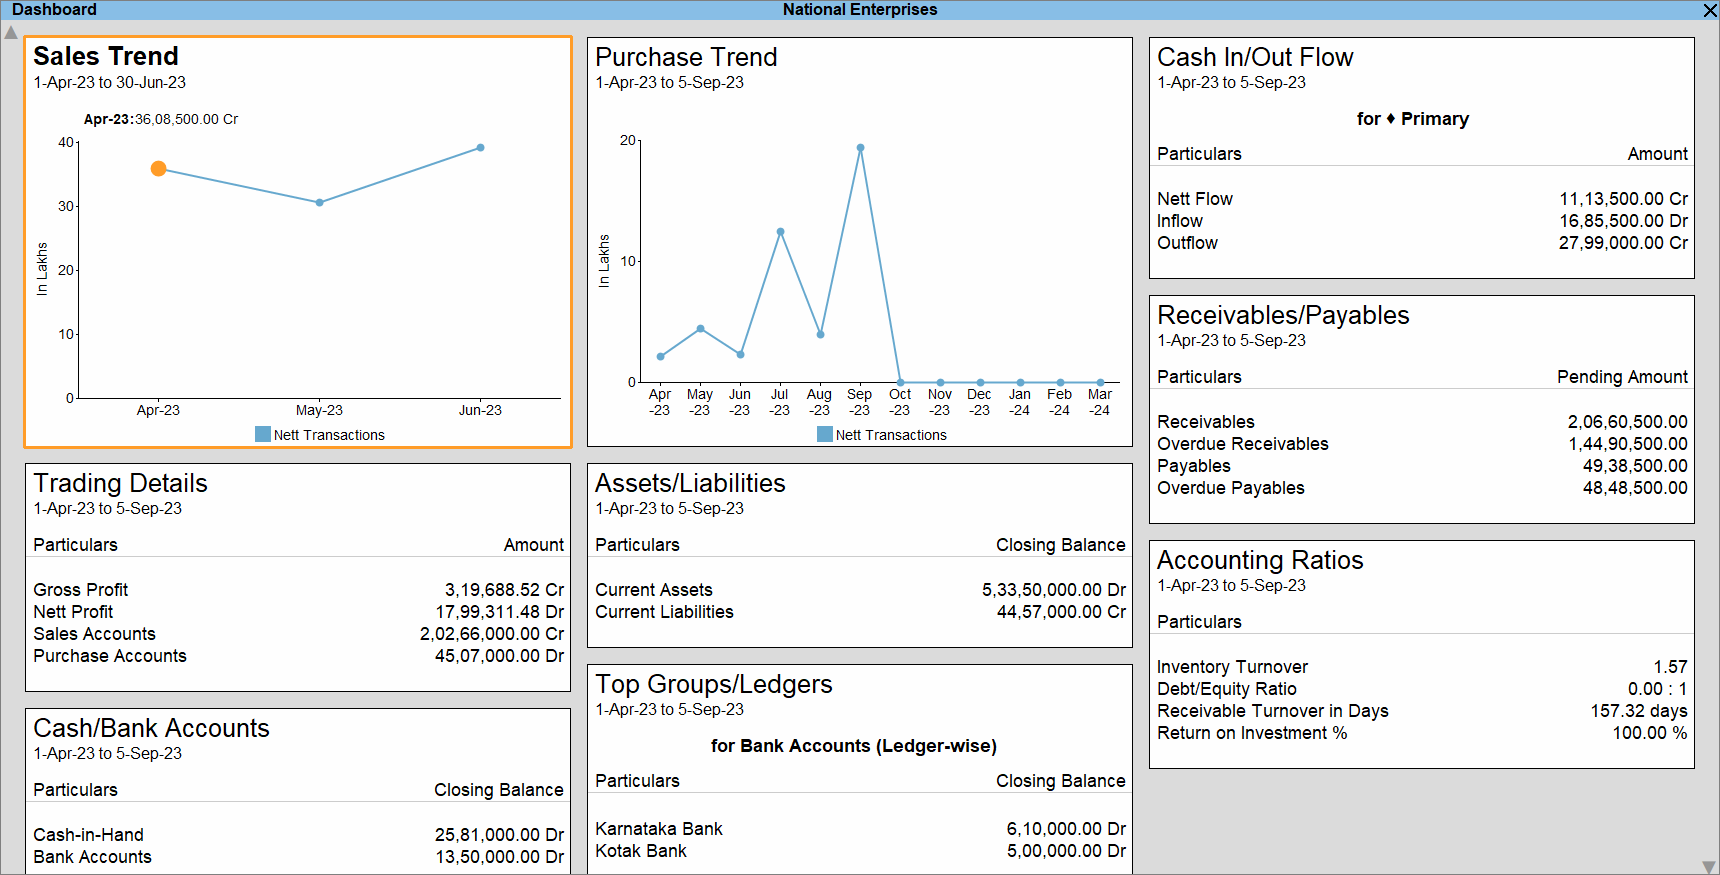
- Navigate through the Dashboard in case of many tiles.
- Press Ctrl+Down to move down in the Dashboard.
Alternatively, click the down arrow key located at the bottom-right corner of the Dashboard. - Press Ctrl+Up to move up in the Dashboard.
Alternatively, click the up arrow key located at the top-left corner of the Dashboard.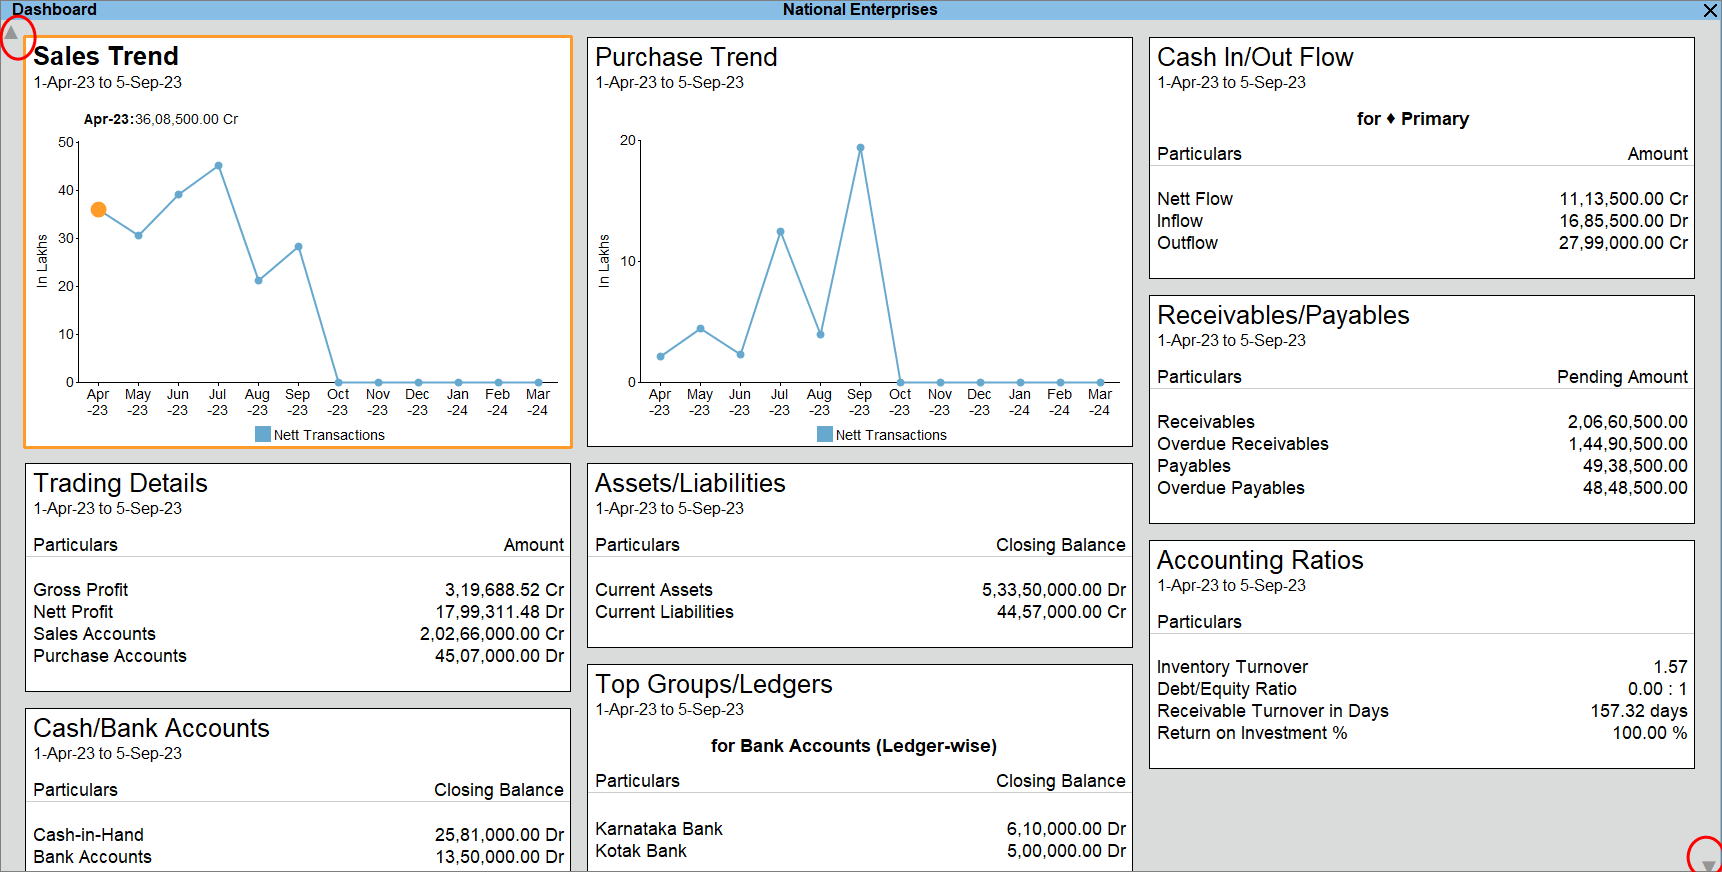
To know how to add tiles to the Dashboard, refer to the Add/Remove tile section.
- Press Ctrl+Down to move down in the Dashboard.
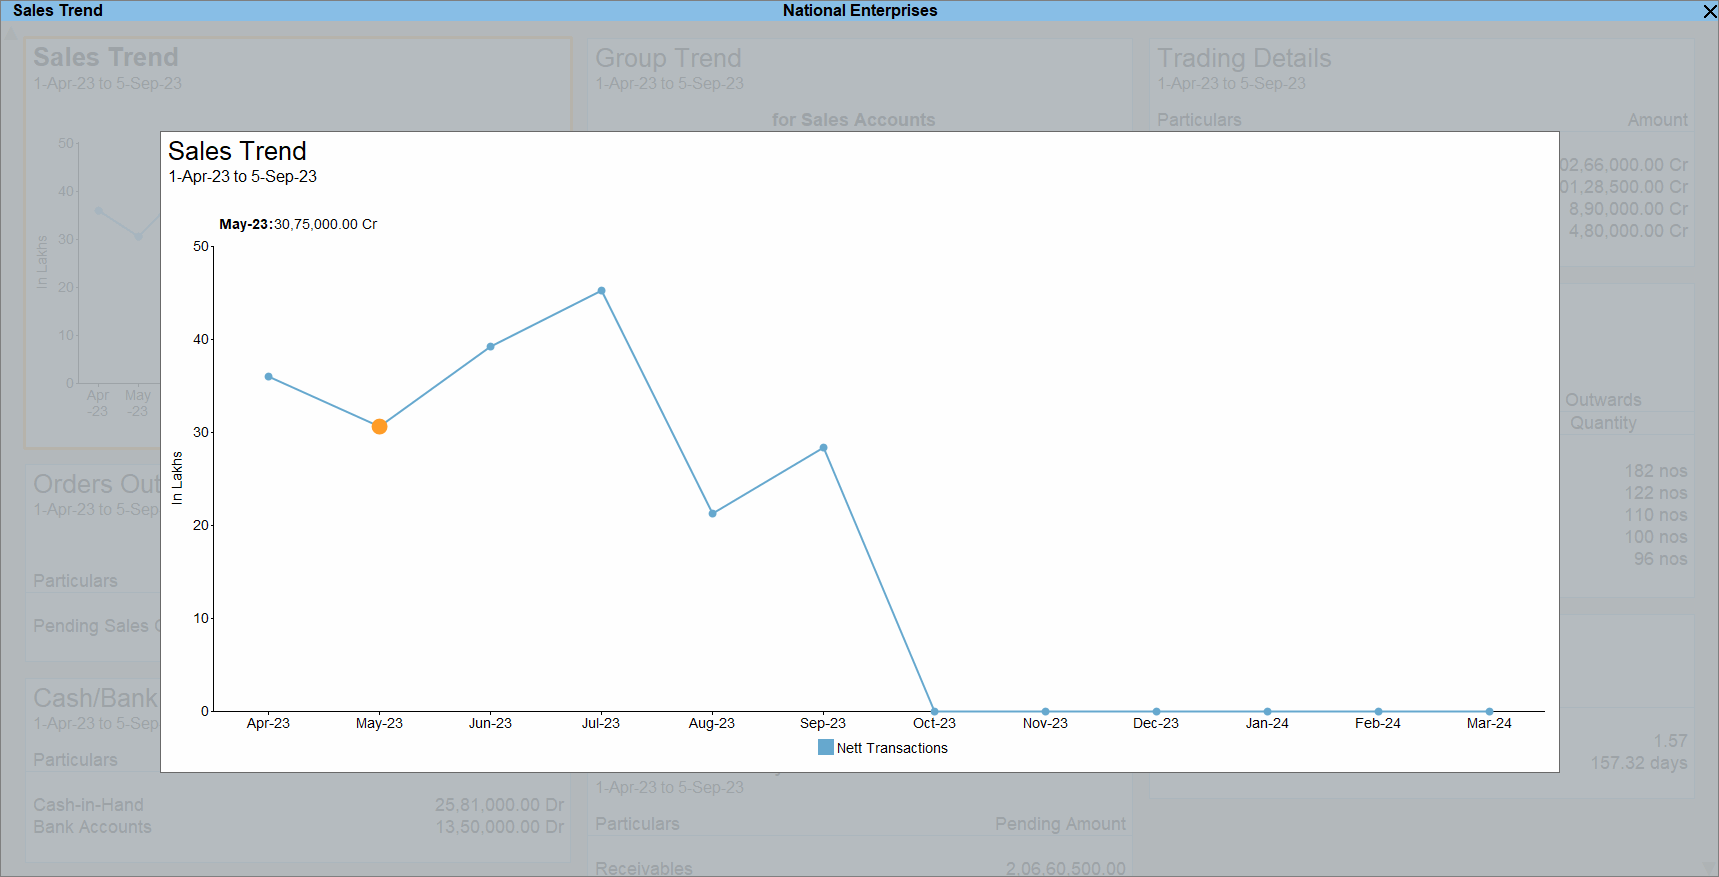
- Drill down to view further.
- Select a detail in the data or a point in the graph.
- Press Enter.
The report opens.
Add/Remove tile
You can add or remove tiles from the Dashboard, as and when required.
When you press Esc and open the Dashboard again, you will get to see the default view of the Dashboard.
However, you have the flexibility to add or remove tiles, as needed, and then save a view of the Dashboard so that you can access the view on the go, whenever needed.
Add tile
ou can easily customize the Dashboard by adding tiles based on your requirements.
For example, you can add tiles to view:
-
Top Ledgers / Groups
-
Top Stock Items / Stock Groups
-
Data in graphical format
You can add:
-
Multiple tiles as needed
-
The same tile multiple times (for different ledgers or groups)
Banking Tiles (TallyPrime Release 6.0 & Later)
If you are using TallyPrime Release 6.0 or later, you can also add:
1. Banking Activities Tile
-
Shows the count and amount of transactions
-
Displays entries pending for reconciliation
-
Shows transactions pending to be sent to the bank
2. Bank Balance (Connected Banking) Tile
-
Displays connected bank accounts
-
Shows the most recently fetched bank balance
- In Dashboard, press Alt+A (Add Tile).
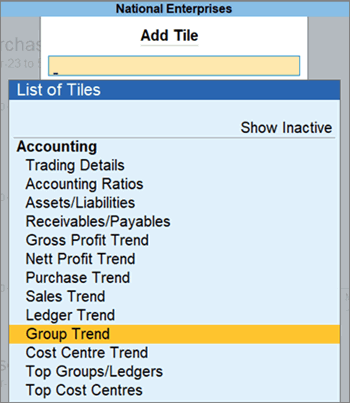
- Select the tile you want to add and press Enter.
The tiles are grouped under Accounting, Inventory, Bank/Cash, and Statutory, on the basis of the data they provide.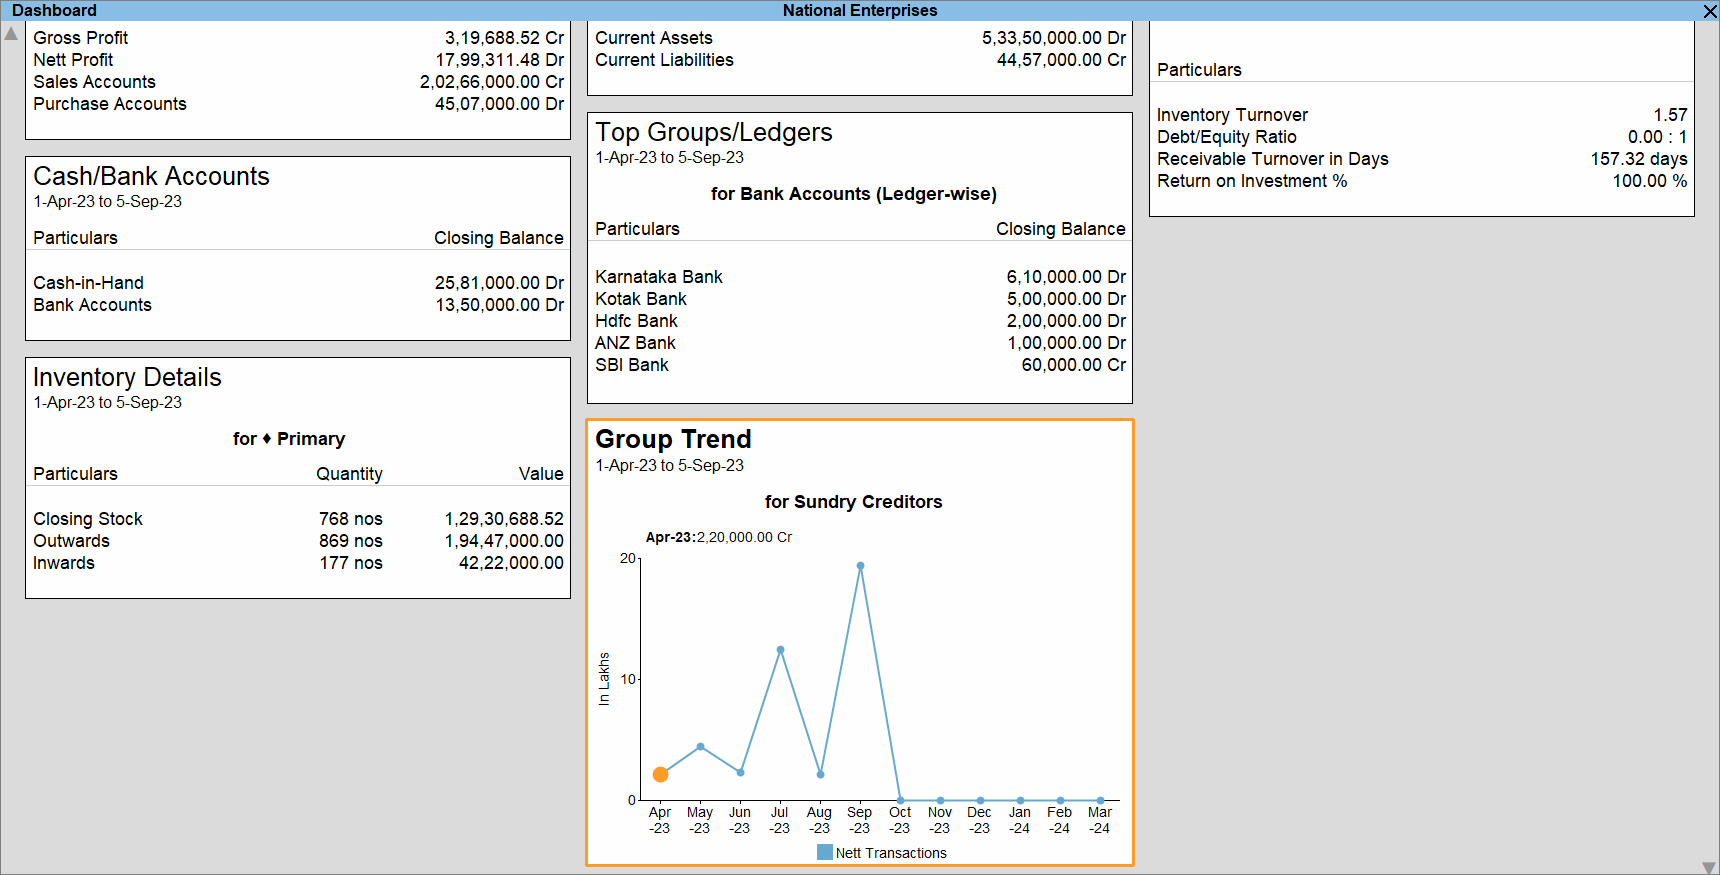
Note: If you select a tile that can be viewed for a specific master – group, ledger, stock group, stock category, stock item, cost centre, or any other master, then you will get a screen to select the master. In such a case, select the master, for instance, Group, and press Enter.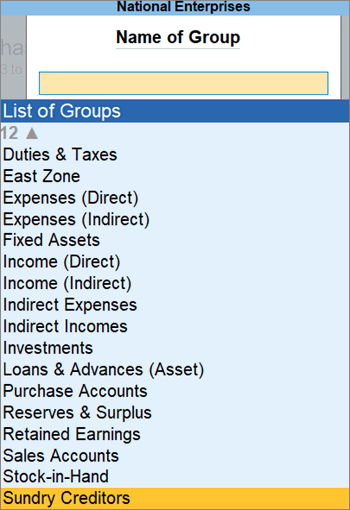
Remove tile
Consider that you want to view the Dashboard with only accounting tiles or inventory tiles, based on the kind of data you want to analyse. Removing a tile from the Dashboard is just a click away. It is important to note that a tile does not get permanently removed from the Dashboard. You can always add the tile back to the Dashboard with the help of the Add Tile button.
- In Dashboard, select the tile you want to remove.
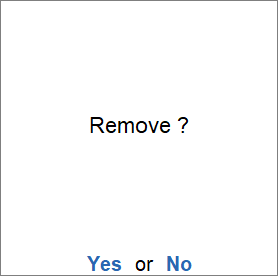
- Press Alt+D (Remove Tile) and press Y.
The tile gets removed from Dashboard.
Change View
You can view the Dashboard in such a way that the tiles are arranged horizontally and all the tiles are displayed in a grid view. The feature gives you the flexibility to arrange tiles vertically, in which case, you need to scroll down to view all the tiles, whenever needed.
View Dashboard Horizontally/Vertically
By default, the tiles are arranged horizontally in a grid view. You can change the view to vertical where you can view a tile per row.
- In Dashboard, press Ctrl+H (Change View) > select Vertical and press Enter.

You can also configure the Dashboard using F12 to view it vertically. To know how to do it, refer to the Configure Dashboard section.
View Dashboard with Predefined Views
You also have Predefined Views that you can open through Change View.You can switch to Sales View/Purchase View, based on the kind of information you want to view in the Dashboard. You may be a sales professional and want to view the tiles related to sales.
- In Dashboard, press Ctrl+H (Change View) > select Purchase Dashboard or Sales Dashboard, as needed, and press Enter.
Alternatively, press Alt+G (Go To) > type or select Purchase Dashboard or Sales Dashboard, as needed, and press Enter.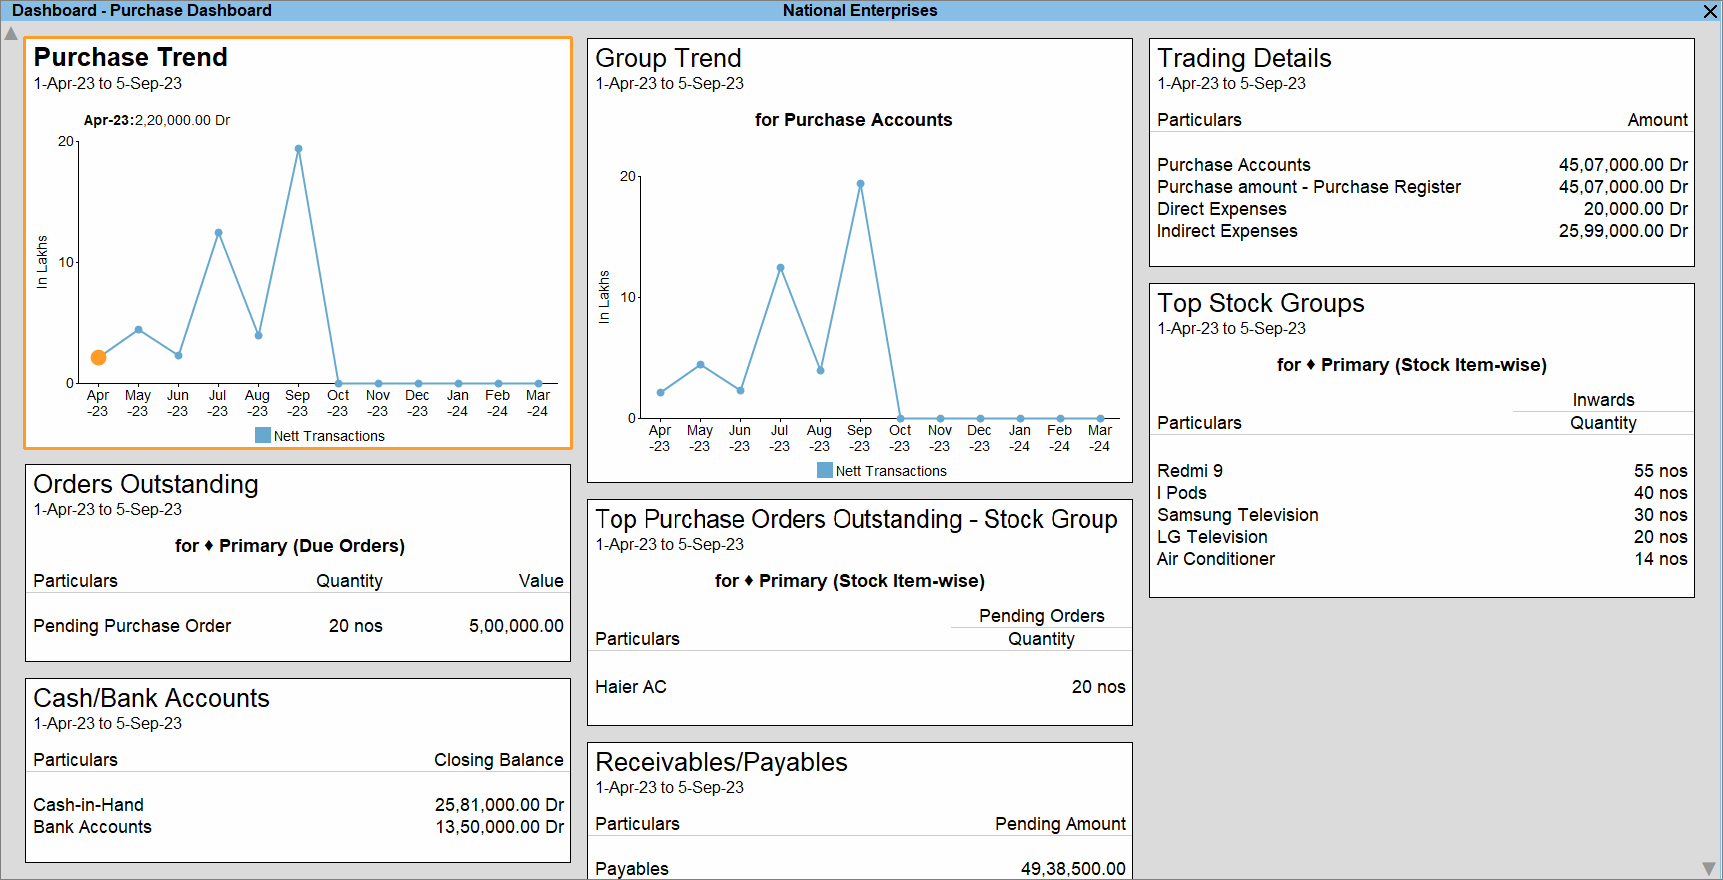
Expand Tile
While in a meeting or working with a colleague, you might want to zoom in or focus on a tile to view the data with better clarity. In such cases, you can expand or enlarge the tile.
- In the Dashboard, select the tile you want to expand.
- Press Alt+V (Expand Tile).
Set Position of Tile
You might have a preference to view or position a tile prior to the other, based on the nature of tiles or the frequency of viewing it. For instance, you might want to arrange all the inventory-related tiles close to each other in the Dashboard. In the Dashboard, you can change the Position of Tile so that the tiles are rearranged.
- In the Dashboard, select the tile to be repositioned.
- Press Alt+C (Configure Tile).
The Tile Configuration screen appears. - Position of Tile: Based on the preferred position of the tile, enter a whole number between 1 and the maximum number of tiles in the Dashboard.
The tile gets repositioned.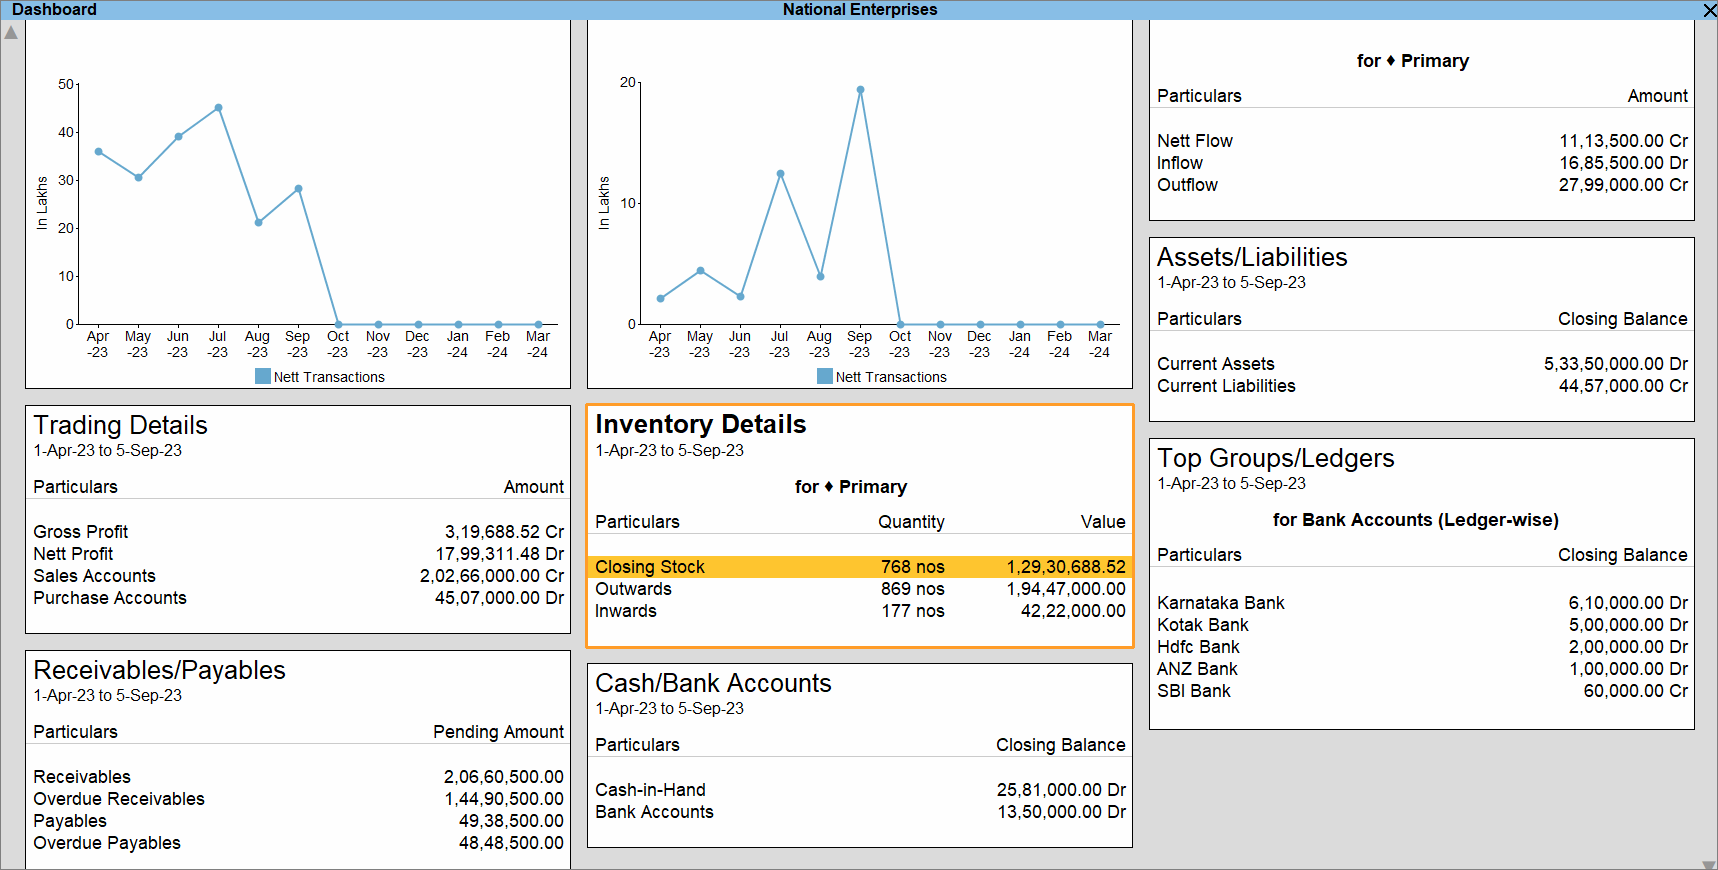
Note: If you press Esc, TallyPrime prompts you if you want to save the Dashboard. If you do not save the Dashboard, then the positioning will not be retained and the Dashboard will get reverted to the default configurations.
View Dashboard for another Company
While you are viewing Dashboard for a specific Company, you have the flexibility to view it for a different Company.
- Press F3 (Change Company).
- Select Company > Specify Path and press Enter > select the Company and press Enter.
Alternatively, Select from Drive > go to the folder > select the Company and press Enter.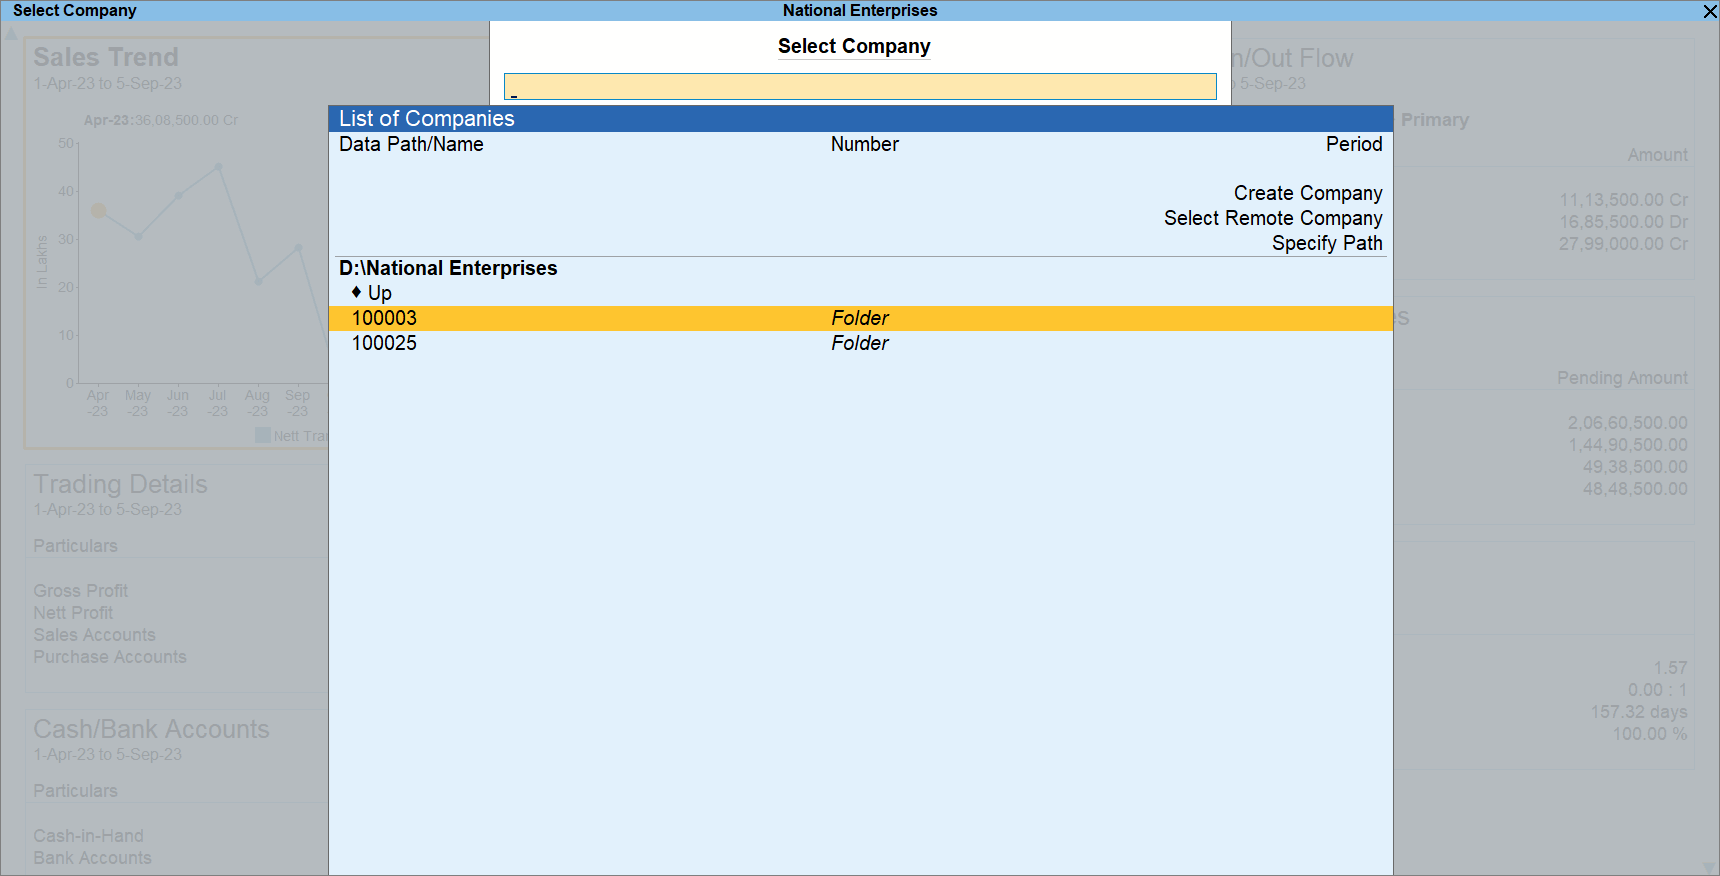
Configure Dashboard
You can change the alignment of tiles in the Dashboard by configuring it. If you want to view a single tile per row, then you can change the view of the Dashboard to Vertical in a matter of seconds.
- In the Dashboard, press F12 (Configure).
- Show Vertical Dashboard: Yes.
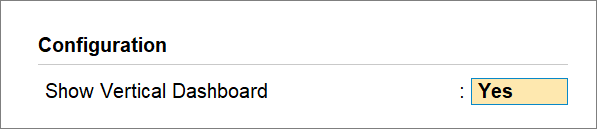
If you want to view the Dashboard tiles arranged in a grid manner, you can set this option as No. - As always, press Ctrl+A to save the configuration.
Configure Tile to View the Required Data/Details
The tile configurations enable you to view the data based on your requirement. Based on the data represented in the tile and the TallyPrime report from which the data is acquired, you get a set of configurations for each tile. There are some configurations that are common to most of the tiles, and the other configurations are specific to a particular tile, based on the type of data displayed.
Configurations common to most of the Tiles
These configurations available in most of the tiles enable you to change the name of the tile, its position in the Dashboard, and display graph, data, or graph & data both, if graph is applicable to the tile.
- While the cursor is on a specific Tile in the Dashboard, for instance, Trading Details, press Alt+C (Configure Tile).
- Name of Tile: You can rename your tile as per your preference, as many number of times as you want.
- Type of Value: Select from Closing Balance, Nett Transactions, or others, based on the values you want to view in the tile.
- Display type: Select Data Only, Graph Only, or Data & Graph, based on your requirement.
- Graph Type: When you enable Graph Only or Data & Graph, you can also select the type of graph you want to view.
- Show Percentages: If the tile has the facility to view percentages, then you can set this option as Yes, if needed.
- Scale Factor: Like in many reports in TallyPrime, you can select a scale factor, according to the scale on which you want to view the data.
- Sorting Method: Select Amount (Decreasing), in which the highest amount gets listed at the top followed by the lower ones, or Amount (Increasing), in which the lowest amount gets listed at the top followed by the higher ones.
Similarly, you can apply Sorting Method based on Quantity. - Position of Tile: You can reposition the tile, as needed.
To know how to do it, refer to the Position of Tile section.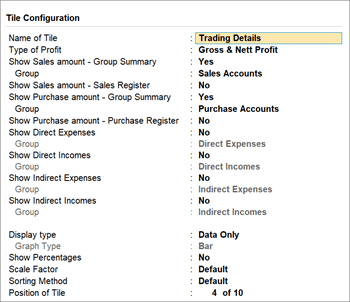
Configurations specific to Tiles
TallyPrime ensures that you can configure a particular tile, just like you configure any other report. The intuitive configuration makes your tile all the more useful in terms of information and data analysis.
- While your cursor is on a specific tile, press Alt+C (Configure Tile).
The Tile Configuration screen appears.
There are four groups of tiles in the Dashboard – Accounting, Inventory, Bank/Cash, and Statutory. Let us take an example from each group of tiles to understand the configurations.
Configure Accounting Tiles
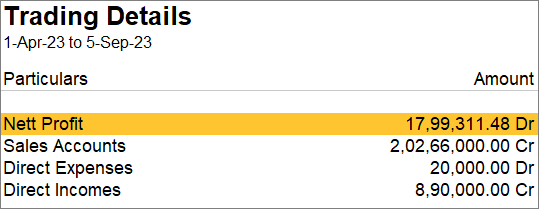
In the Trading Details tile, which is grouped under Accounting, consider that you want to view the Nett Profit gained for a specific Period. Additionally, you want to view the Direct Expenses and Direct Incomes.
In such a case, you can configure the tile as per the options in the following image:
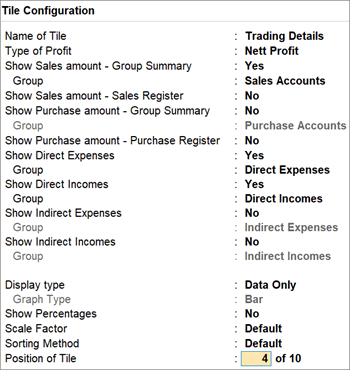
Once you configure the tile, you get to view the desired details as in the image below:
Similarly, you can configure other Accounting tiles, based on the information you want to view.
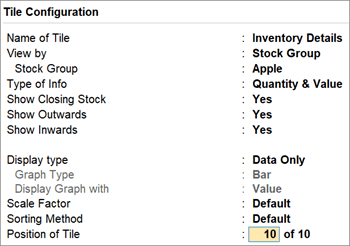
Configure Inventory Tiles
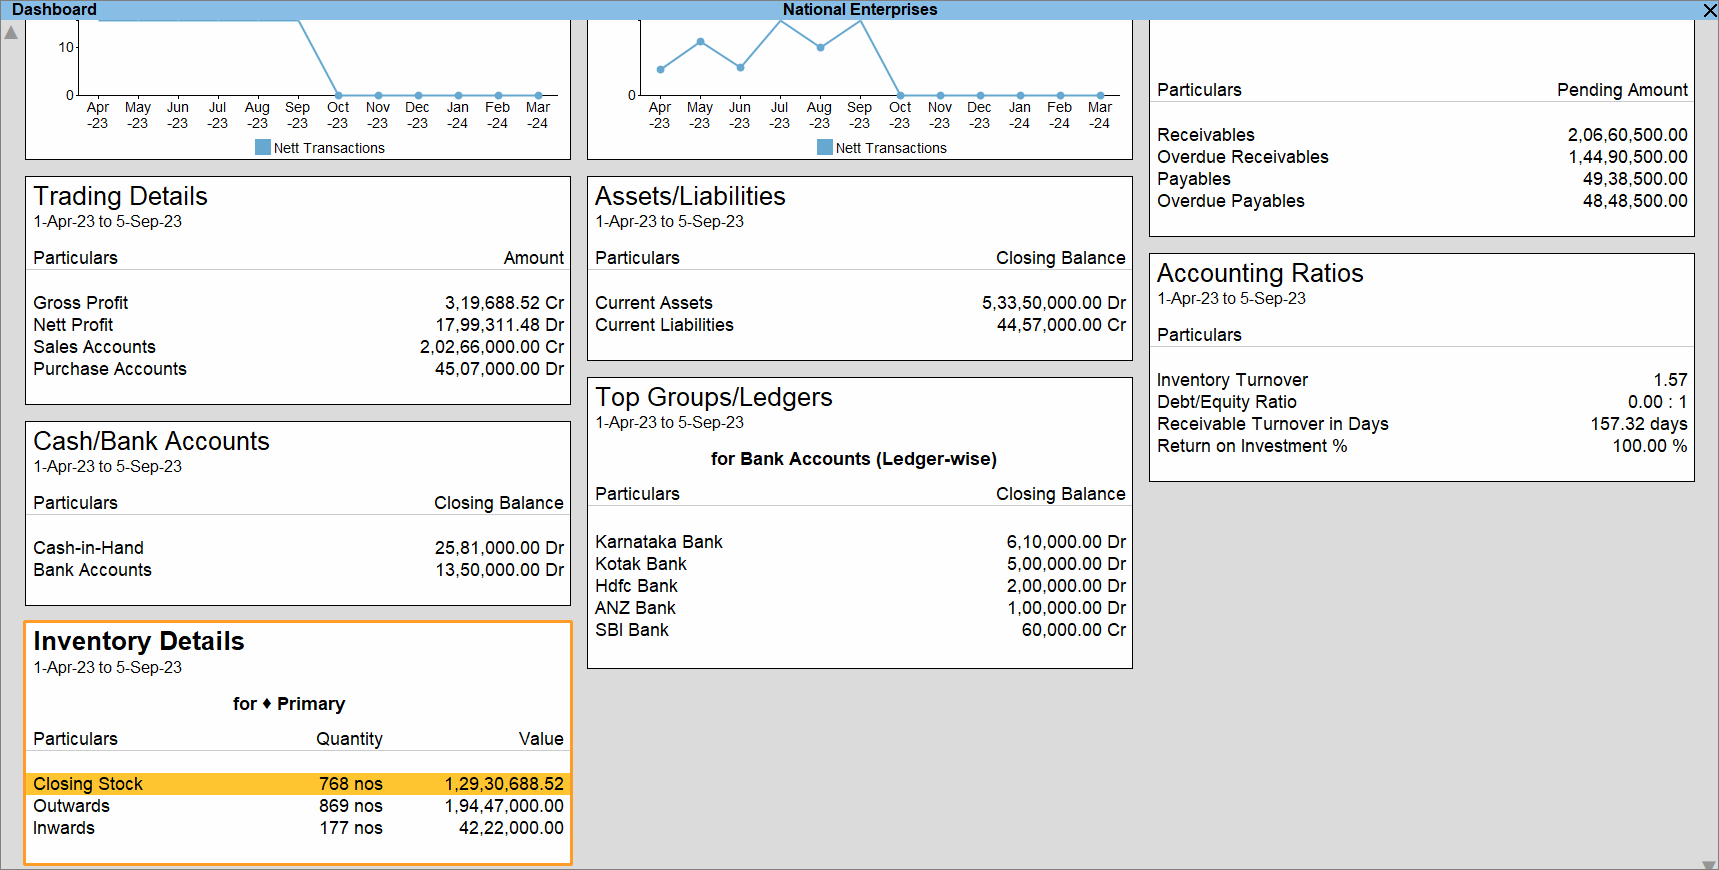
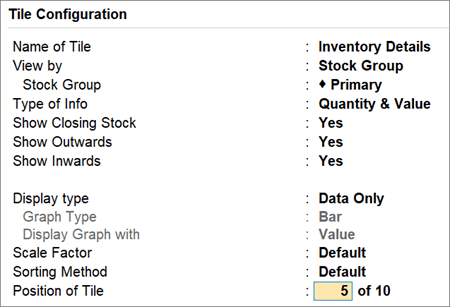
In the Inventory Details tile, which is grouped under Inventory, consider that you want to view the details for a specific Stock Group.
In such a case, you can configure the tile as per the options in the following image:
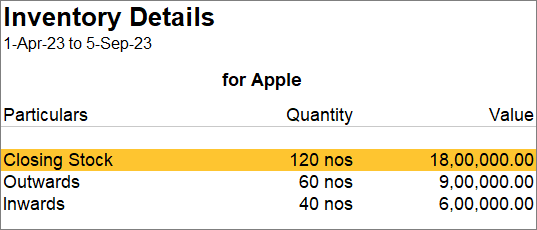
Once you configure the tile, you get to view the desired details as in the image below:
Similarly, you can configure other Inventory tiles, based on the information you want to view.
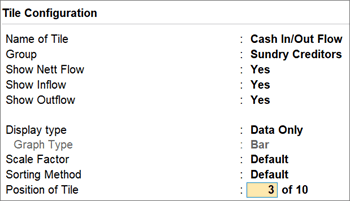
Configure Bank/Cash Tiles
In the Cash In/Out Flow tile, which is grouped under Bank/Cash, consider that you want to view the Nett Flow, Inflow, and Outflow for Sundry Debtors.
In such a case, you can configure the tile as per the options in the following image:
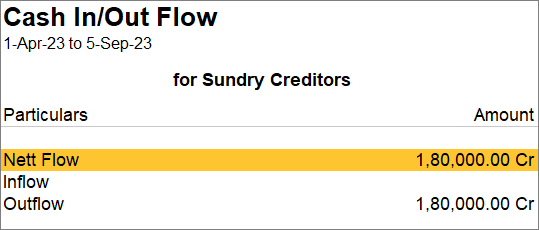
Once you configure the tile, you get to view the desired details as in the image below:
Similarly, you can configure other Bank/Cash tiles, based on the information you want to view.
Configure Statutory Tiles
Consider that you want to view the pending actions that you need to take to reconcile GSTR-2A. So, you will not want to view the reconciled transactions in the tile.
In such a case, you can configure the tile as per the options in the following image:

Once you configure the tile, you can see that the Reconciled Transactions are not part of the tile:

Similarly, you can configure other Statutory tiles, based on the information you want to view.