The Pillars of Banking in TallyPrime
1. Automated Data Entry (e-Banking)
Instead of manually typing every transaction from your bank statement, TallyPrime allows you to Import Bank Statements.
-
Auto-Voucher Creation: The software identifies the transactions in your statement and helps you create the corresponding Payment or Receipt vouchers automatically.
-
Accuracy: This eliminates human typing errors and ensures that dates, amounts, and instrument numbers are captured exactly as they appear on the bank’s records.
2. Enhanced Bank Reconciliation (BRS)
Bank Reconciliation is often the most time-consuming task for an accountant. TallyPrime simplifies this by:
-
Auto-Reconciliation: By importing your bank statement (in Excel, CSV, or XML formats), Tally automatically matches the “Bank Date” with your “Voucher Date” based on instrument numbers and amounts.
-
Sync Identification: It clearly shows you which entries are “In Books but not in Bank” (e.g., unpresented cheques) and “In Bank but not in Books” (e.g., bank charges or direct transfers).
3. Comprehensive Transaction Tracking
When recording a banking voucher (F5 for Payment / F6 for Receipt), TallyPrime captures:
-
Transaction Types: ATM, Card, Check, ECS, e-Fund Transfer, and Others.
-
Bank Details: It allows you to manage multiple bank accounts, track cheque ranges, and even print cheques directly from the software.

The TallyPrime Banking Suite
-
Automate Accounting Using Bank Statements: Import your electronic bank statements (Excel/CSV/XML) to create vouchers automatically, reducing manual data entry and human error.
-
Bank Reconciliation: A powerful tool to match your internal book records with your actual bank statement, helping you identify unreconciled checks or bank charges instantly.
-
Connected Banking: A direct bridge between TallyPrime and your bank that allows you to fetch real-time balances and automate the payment lifecycle without leaving the software.
-
e-Payments: Send payment instructions directly to your bank for bulk transfers (NEFT/RTGS/IMPS), eliminating the need to manually log in to your bank’s portal for every transaction.
-
Payment Request: Generate and share payment links (via QR codes or links) with your customers, allowing them to pay you instantly through UPI or credit/debit cards.
-
Cheque Payments: Manage your physical cheque books, track leaf numbers, and print professional cheques directly onto your bank’s stationery from Tally.
-
Deposit Slips: Automatically generate a printed summary for cash or cheques received, ready to be submitted to the bank for a hassle-free deposit process.
-
Payment Advice: Create a formal document for your suppliers that provides a breakdown of the invoices being paid, ensuring clear communication and better relationship management.
Import Bank Statements in TallyPrime
Importing bank statements to TallyPrime helps you:
- Auto-create vouchers: TallyPrime reads your bank statement and fills in the payment or receipt details for you – whether you want to create single, multiple, or a consolidated voucher.
- Auto-Reconcile bank transactions: It checks your bank statement against your transactions in books and helps you spot which ones match and which ones might need appropriate actions.
TallyPrime supports import of Bank Statements for 145+ banks.
If your bank/statement format is not supported, then write to support@tallysolutions.com. We will set it up.
There are two ways to make bank statement entries a part of your Company data:
- Download the bank statement and import it to TallyPrime.
- Get Statement using Connected Banking.
Before you begin, you need to note that you can import a bank statement if:
- The statement is not already open.
- The statement is in the correct format.
- You have the Write permission to the folder.
- Gateway of Tally > press Alt+O (Import) > Bank Statement.
- In the Import Bank Statement screen, specify the required information.
- Select Bank Ledger.
- Specify File Path.
- Select File Type as Supported.
- Select the File to Import.
- Set Show Preview as Yes.
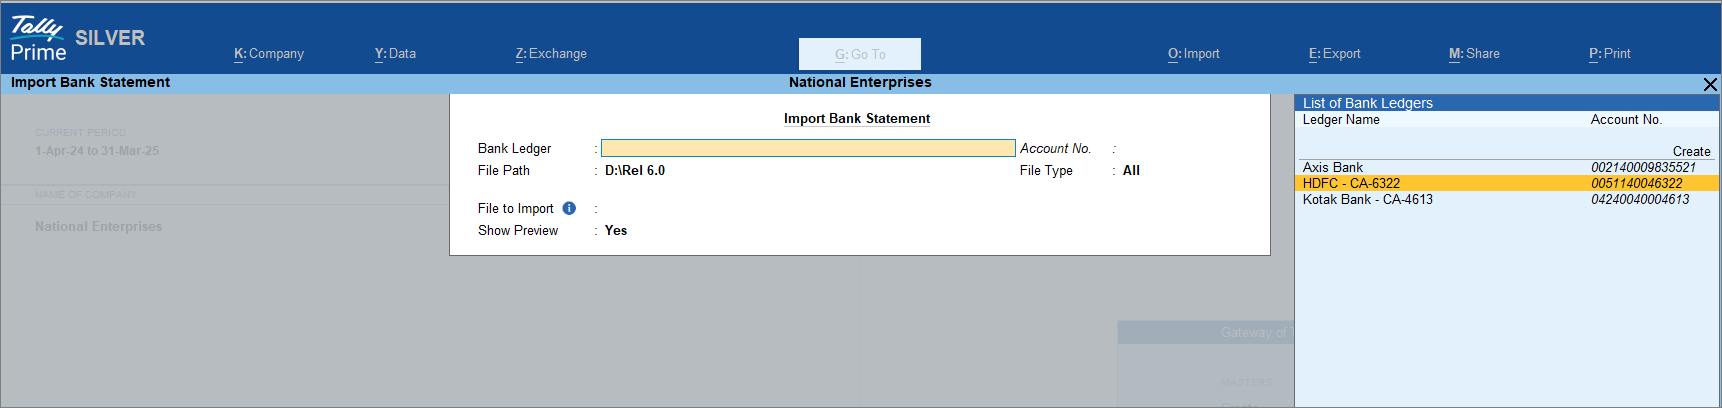
- Press Ctrl+A to import the Bank Statement.
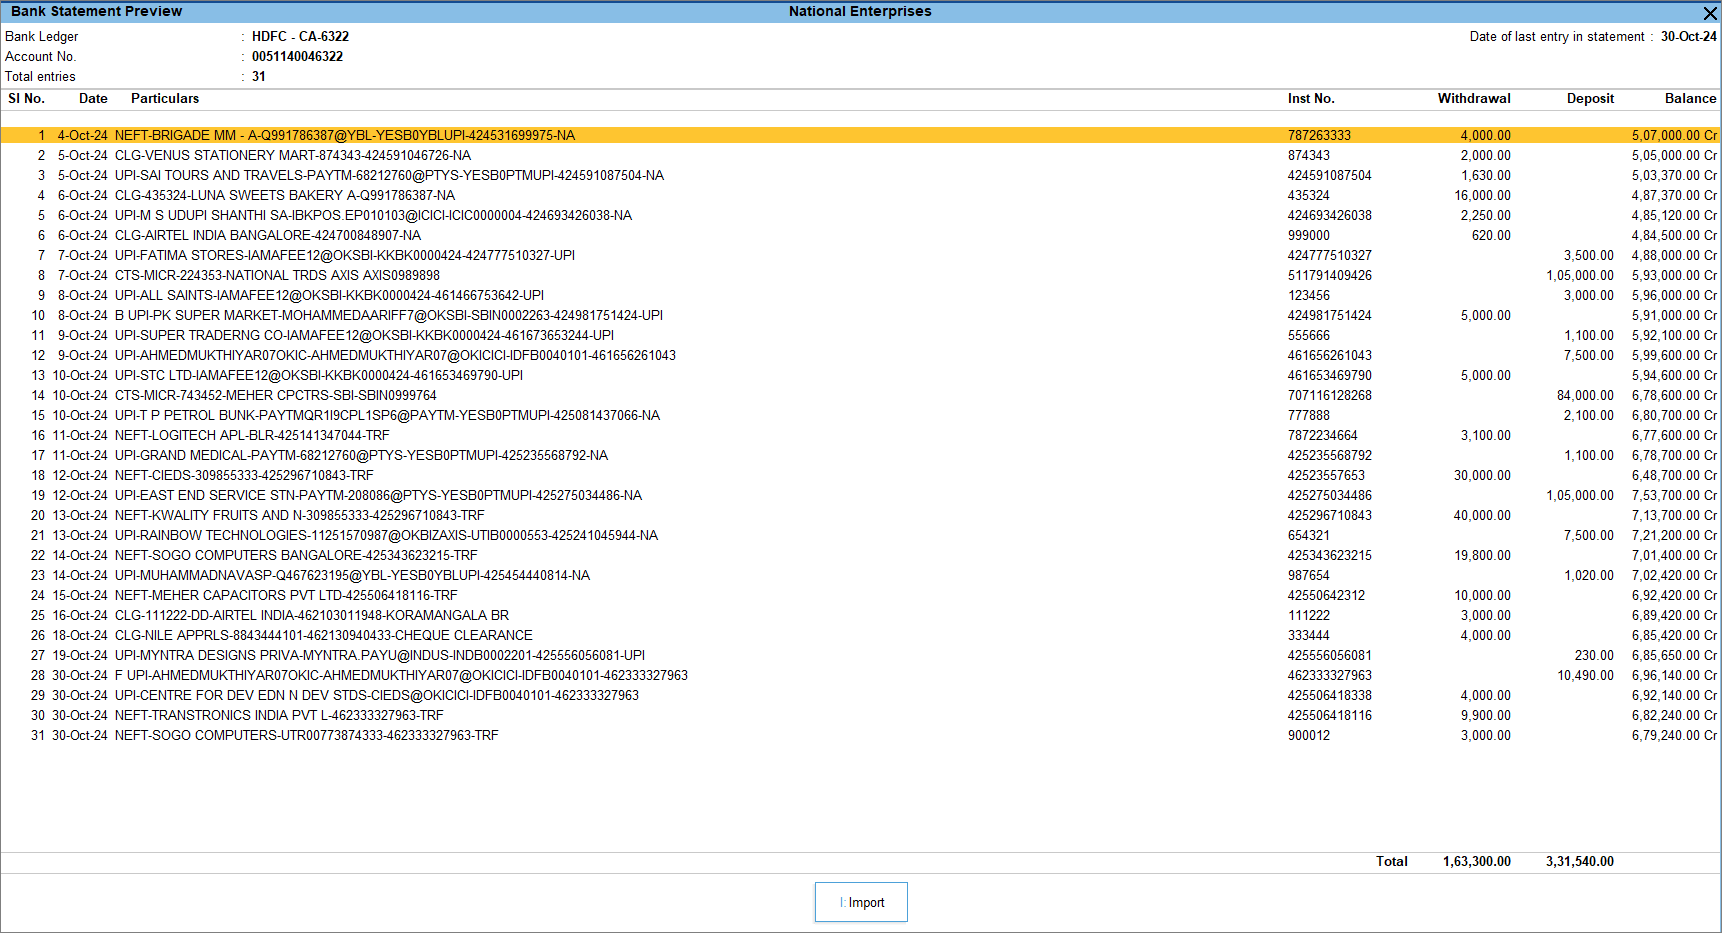
- In the Bank Statement Preview screen, press I (Import) to complete the import.
You can see the total number of entries imported and exact matches in the Summary of Imported Statement.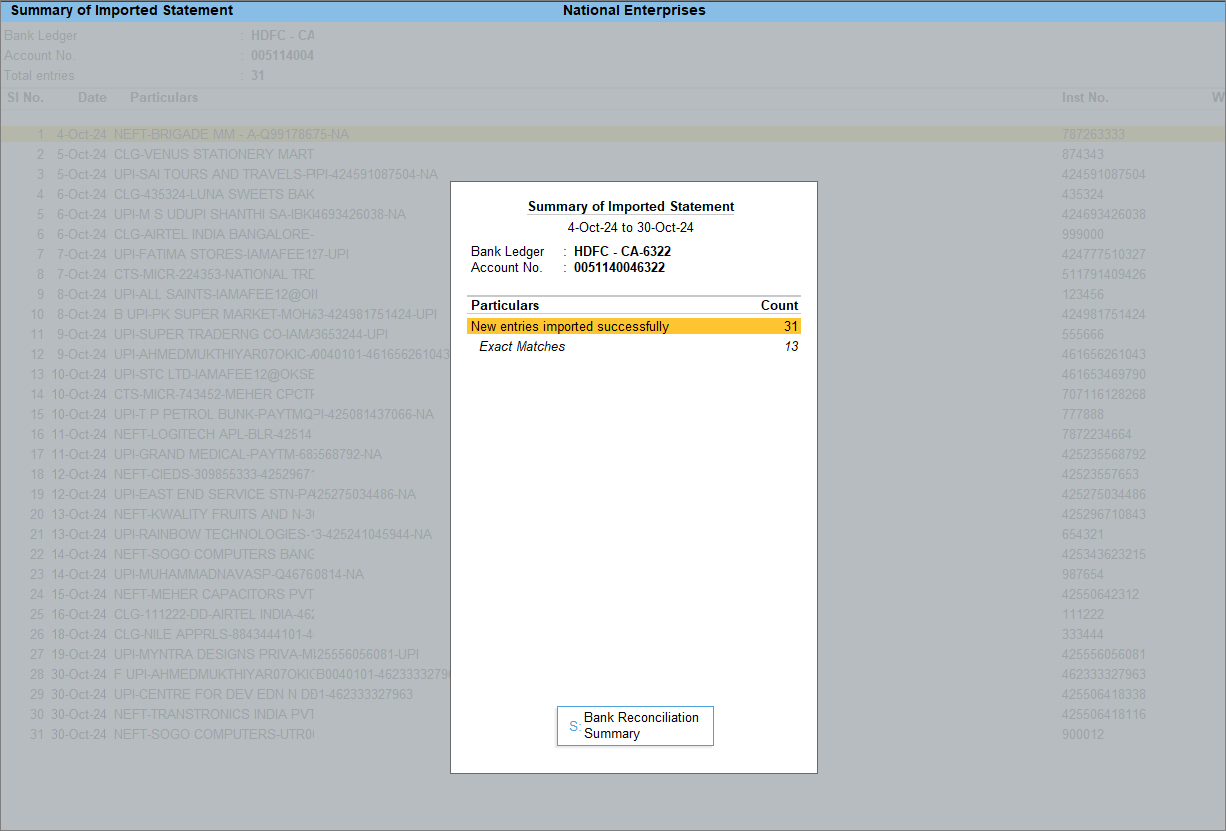
- Press S (Bank Reconciliation Summary) to go to the Bank Reconciliation Summary report.
Create Payment Vouchers with e-Payment Details
- Press Alt+G (Go To) > Create Voucher > press F5 (Payment), and press Enter.
- Debit the party ledger and credit the bank ledger configured for e-Payments.
- Verify the e-Payments details.
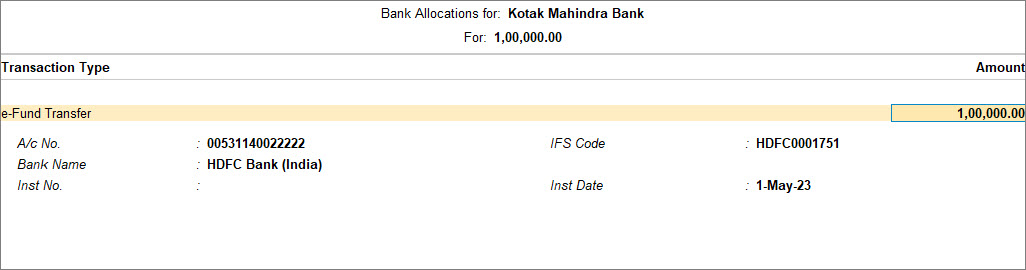
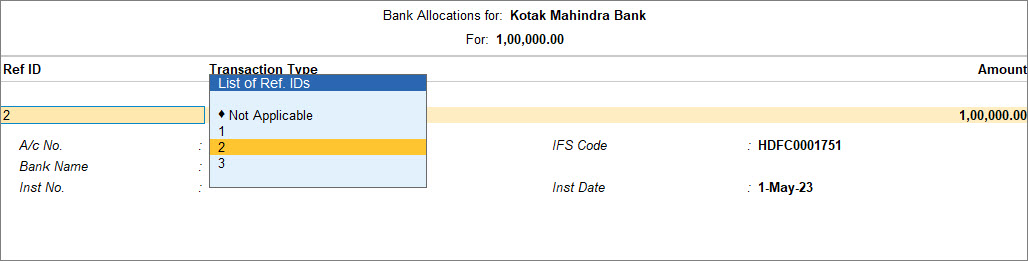
- In the Bank Allocations screen, select e-Fund Transfer as the Transaction Type.
- Enter other details such as A/c No., IFS Code, Bank Name, Inst No., and so on if you have not maintained the beneficiary details in the party master.
- Press F12 (Configure), and set the option Show Ref ID to Yes, if multiple beneficiary details are maintained.
The Ref ID column appears in the Bank Allocations screen. - Press Backspace to select the required beneficiary for the transaction.
- Press Ctrl+A to accept the Bank Allocations screen.
- Press Ctrl+A to save the payment voucher.
If you have chosen to Export/Upload Payment Instructions on voucher creation in the bank ledger, then the Exporting Payment Instructions screen appears.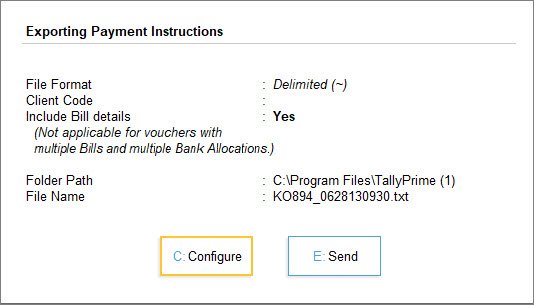
- Press E (Send) to export the details.
Press C (Configure) to change the configurations, if needed.
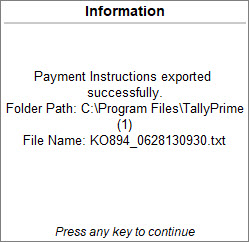
On a successful export, the following message appears.
Q – How to I export e-Payments for DBS Bank?
A – For DBS, the transactions are directly uploaded to the bank portal, if you are logged in with the Tally.NET User ID registered with the bank.
You can view the status in the e-Payments report and authorise the same on the bank portal.
Q – Why am I unable to export an e-Payment?
A – The transaction does not get exported if:
-
The beneficiary account details (like A/c No., IFS Code, and so on) are not provided in the ledger or transaction.
-
There is a mismatch in the details between the ledger and master, and you have set Allow export of transactions with mismatch in Bank Details to No.
Print Cash Deposit Slips
The Cash Deposit Slip in TallyPrime includes all essential details, including Account Number, Account Holder Name, Bank Name, Branch Name (as available in the bank ledger), Company’s Telephone Number (based on the mobile number entered in the Company), and Cash Denomination Details.
![]()
- Open the Cash Deposit Slip.
- Press Alt+G (Go To) > type or select Cash Deposit Slip, and press Enter.
- Select the required Bank account from the list for whose transaction you want to print Cash Deposit Slip and press Enter.
- Press F5 (Cash) to view the Cash Deposit Slip.

- Print the Cash Deposit Slip.
- To include selected receipts in the Cash Deposit Slip, press Spacebar on the required receipt rows, and press Ctrl+P to print.
- To include all the receipts in the Cash Deposit Slip, press Ctrl+P to Print.
- Select the options to print the Cash Deposit Slip separately or consolidated.
- Print Cash Deposit Slip: Set this option to Yes to print the Cash Deposit Slip for the selected transaction.
- Show consolidated Cash Deposit Slip: Enable this option, to print one consolidated Cash Deposit Slip for all selected transactions. By default, this is set to No.
- In the Cash Deposit Slip Details screen, press C (Configure) to configure the report before printing.
- Date of Print: The date that has to be printed on the Cash Deposit Slip has to be specified in this field. By default, the current system date is displayed. Usually, this date will be the date on which the actual deposit of the cash into the bank will be made.
- Print Voucher Type/No.: Enable to print the voucher type and number.
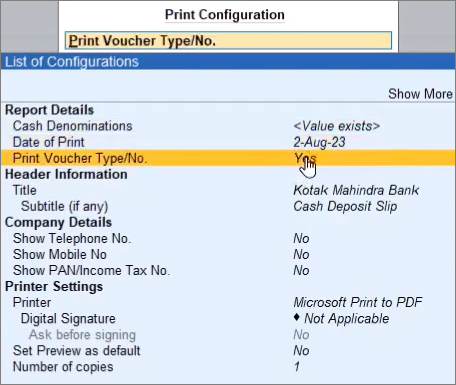
- Press P (Print) to print the Cash Deposit Slip.
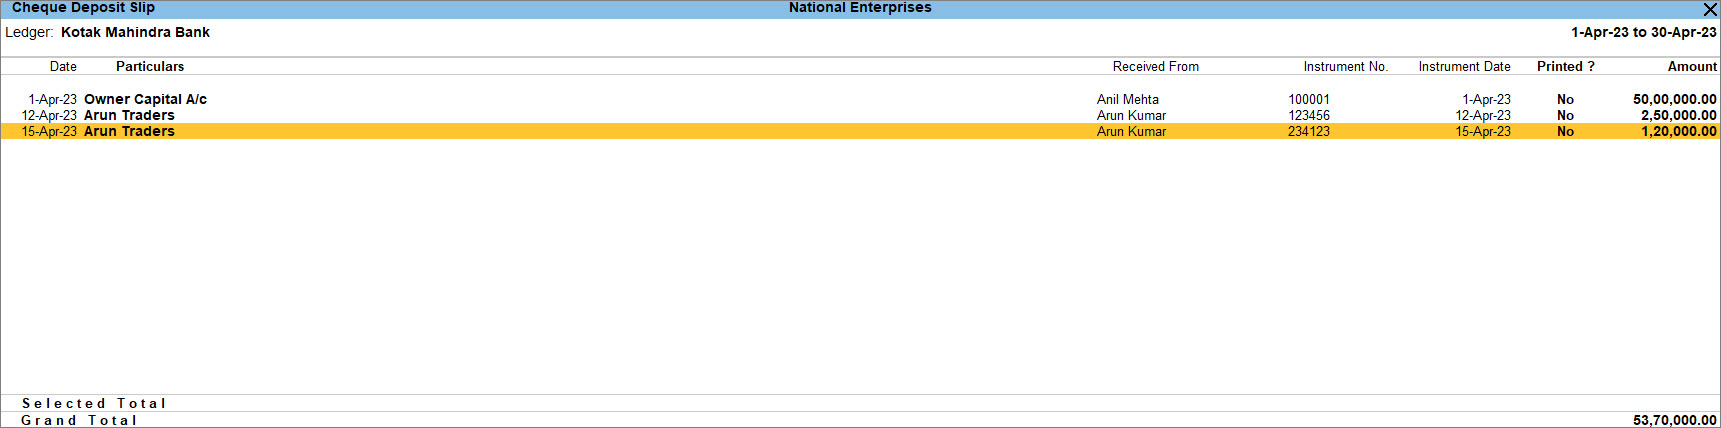
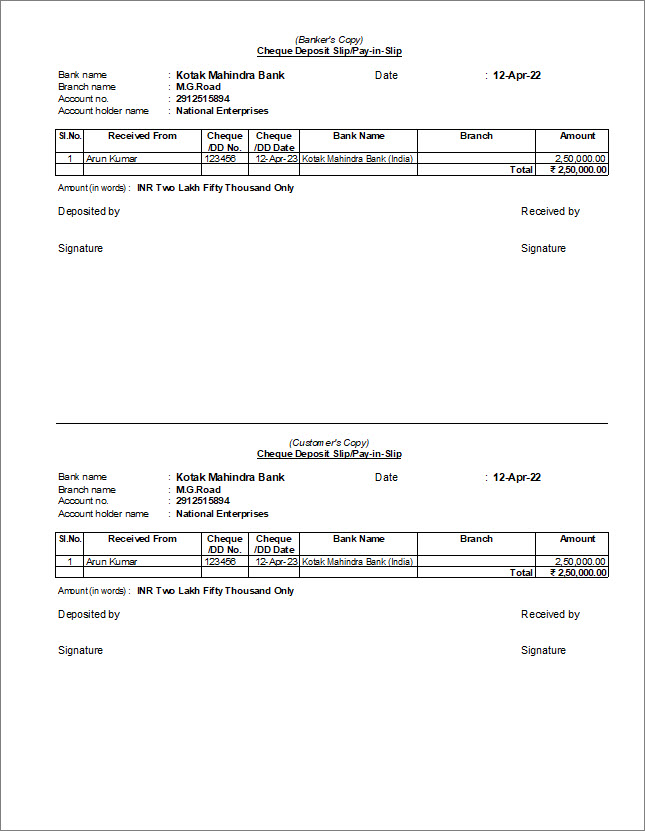
Print Cheque Deposit Slips
The Cheque Deposit Slip contains the name of the company or person from whom you have received the cheque along with other details such as Account Holder’s Name, Bank Name, Branch Name (as available in the bank ledger), Cheque Date, Cheque No., and Amount.
- Open the Cheque Deposit Slip.
- Press Alt+G (Go To) > type or select Cheque Deposit Slip, and press Enter.
- Select the required Bank account from the list for whose transaction you want to print Cheque Deposit Slip and press Enter.
- Print the Cash Deposit Slip.
- To include all the receipts in the Cheque Deposit Slip, press Ctrl+P to Print.
- To include selected receipts in the Cheque Deposit Slip, press Spacebar on the required receipt rows, and press Ctrl+P (Print) to print.
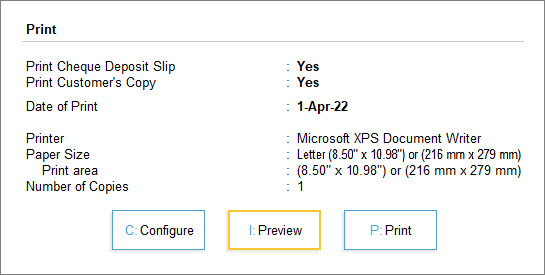
- Press C (Configure) to configure the report before printing.
- Print Cheque Deposit Slip: By default, this option is set to Yes.
- Date of Print: By default, the system displays the current date. Specify the required date to be printed in the Cheque Deposit Slip.
- Top Margin (in Inches): Set the required space.
- Show Received From: Set this option to Yes to print the Received From details in the deposit slip.
- Show Telephone No.: Set this option to Yes to print the company’s telephone number.
- Show Mobile No: Set this option to Yes to print the company’s mobile number.
- Show PAN/Income Tax No.: By default, this option is set to Yes.
- Press P (Print) to print the Cheque Deposit Slip.
Configure Cash and Cheque Deposit Slips Reports
You can further apply settings to view the Cash or Cheque Deposit Slip report.
Change Bank Ledger: Press F4 (Bank), select the bank, and press Enter.
Switch to Cheque Deposit Slip: Press F5 (Cheque/Cash). Alternatively, press Ctrl+H (Change View) and select Cheque Deposit Slip/Cash Deposit Slip, as needed.
View Printed Slips: Press F8 (Incl Printed). Alternatively, press Ctrl+B (Basis of Values) and Include Printed Slips.
View Optional and Post-Dated Vouchers: Press Ctrl+J (Exception Reports) and choose to view Optional and Post-Date vouchers.
Mark Slips as Printed: When data is migrated from an earlier release, some transactions with printed payment advice may appear as not printed. You can use this option to mark them as printed. To do this, select the transaction by pressing the Spacebar.
Alter Cheque Details: In case of Cheque Deposit Slip, you can alter cheque details. Press Alt+H (Alter Chq Details) and alter the Instrument No. and Received From fields, as needed.
You can also make necessary changes in the configuration from F12 (Configure) or view the Cash Deposit Slip with different range filters from Alt+F12 (Range).