Accounting & Financial Reports in TallyPrime
Accounting and Financial Reports in TallyPrime give a complete overview of a business’s:
-
Financial performance
-
Financial position
-
Cash flow
-
Outstanding balances
These reports summarize all transactions over a period and convert complex financial data into meaningful and actionable insights. They help business owners make informed financial decisions and plan for growth.
Major Accounting & Financial Reports
1. Balance Sheet
The Balance Sheet shows the financial position of the business at a particular point in time.
It displays:
-
Assets (what the business owns)
-
Liabilities (what the business owes)
-
Capital / Equity
It provides a real-time snapshot of company strength.
View Balance Sheet
- Press Alt+G (Go To) > type or select Balance Sheet > press Enter.
Alternatively, go to Gateway of Tally > Balance Sheet.
You can see the Liabilities for your company on the left and the Assets on the right.
A few of the critical uses of a Balance Sheet are as follows:
2. Profit & Loss (P&L) Account
The P&L Account shows:
-
Total Revenue
-
Total Expenses
-
Net Profit or Net Loss
It helps measure the company’s ability to generate profit during a specific period.
View Profit & Loss A/c
By default, the Profit & Loss A/c report will be generated as on the date of the last voucher entry. You can change the date to view the report for the required period.
- Gateway of Tally > Profit & Loss A/c.
Alternatively, Alt+G (Go To) > type or select Profit & Loss A/c > press Enter.
- Press Alt+F5 (Detailed) for a detailed format of the report.
The Profit & Loss A/c is generated from the date of opening of the books till the date of last entry.
- Press F2 (Period) to change the period as required.
Configure Profit & Loss A/c
You can view Profit & Loss A/c for profit and loss statement in a number of formats. Press F12 to explore and apply the required format.
- Vertical format: By default, the Profit & Loss A/c appears in the horizontal format. If your business prefers the vertical format, then you can set the option Show Vertical Profit & Loss to Yes.
In the vertical format of the Profit & Loss A/c, you can see that the groups now appear under Trading Account and Income Statements.
- Percentages: If you want to view each line in the Profit & Loss A/c as a percentage of the sales accounts, then set the option Show Percentages to Yes. The sales accounts will be considered as 100%, and the rest of the lines would be represented as a percentage of the sales accounts.
- Gross Profit: If you want to split the Profit & Loss A/c to see the trading profit, then set Show with Gross Profit to Yes. This will consider only Cost of Sales and Direct Expenses. Indirect Expenses will be deducted from the Gross Profit to show the Nett Profit. This option is available only in the horizontal form of the Profit & Loss A/c.

Compare Information Using Profit & Loss A/c
You can use the Profit & Loss A/c to compare financial information across companies, time periods, valuation methods, and so on. By comparing time periods, you can easily measure the profits, pattern of expenses, and so on. You can choose different time periods such as daily, weekly, monthly, quarterly, and so on.
- Profit & Loss A/c > Alt+N (Auto Column).
- Select Quarterly in the Auto Column field.
3. Cash Flow Statement
The Cash Flow Statement shows:
-
Cash Inflows
-
Cash Outflows
It helps understand:
-
Where cash is coming from
-
Where cash is being used
TallyPrime also provides a Cash Flow Projection Report to estimate future cash movement.
Cash Flow is the inflow and outflow of cash during an accounting period, that portrays how businesses manage their cash. Here, the term ‘cash’ stands for cash and bank balances. Playing a crucial role in analyzing the economic standing of a business, a cash flow statement keeps track of the amount of money that flows in and out due to business handling.
- Press Alt+G (Go To) > type or select Cash Flow > press Enter.
Alternatively, Gateway of Tally > Display More Reports > Cash Flow.
A sample image of the Cash Flow statement appears, as shown below: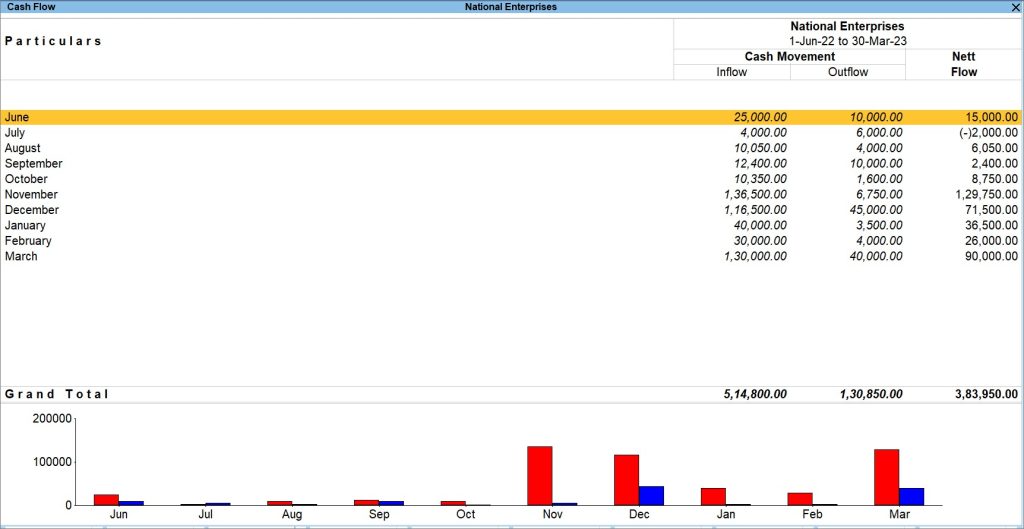
4. Funds Flow Statement
The Funds Flow Statement shows:
-
Sources of funds
-
Application of funds
It helps analyze whether working capital is used effectively.
You can view the Funds Flow report in TallyPrime to track the changes in your working capital as it displays the opening and closing working capital of a period and the net change as funds flow.
- Press Alt+G (Go To) > type or select Funds Flow > press Enter.
Alternatively, Gateway of Tally > Display More Reports > Funds Flow. - Press F2 (Period) to set the required period. The Funds Flow statement appears as shown below:
5. Receivables Report
Receivables are amounts to be received from customers for credit sales.
This report helps:
-
Track outstanding customer balances
-
Manage collection of dues
-
Improve cash flow
Gateway of Tally > Display More Reports > Statement of Accounts > Outstandings > Receivables.
Alternatively, Alt+G (Go To) > type Bills Outstanding or Bills Receivable.
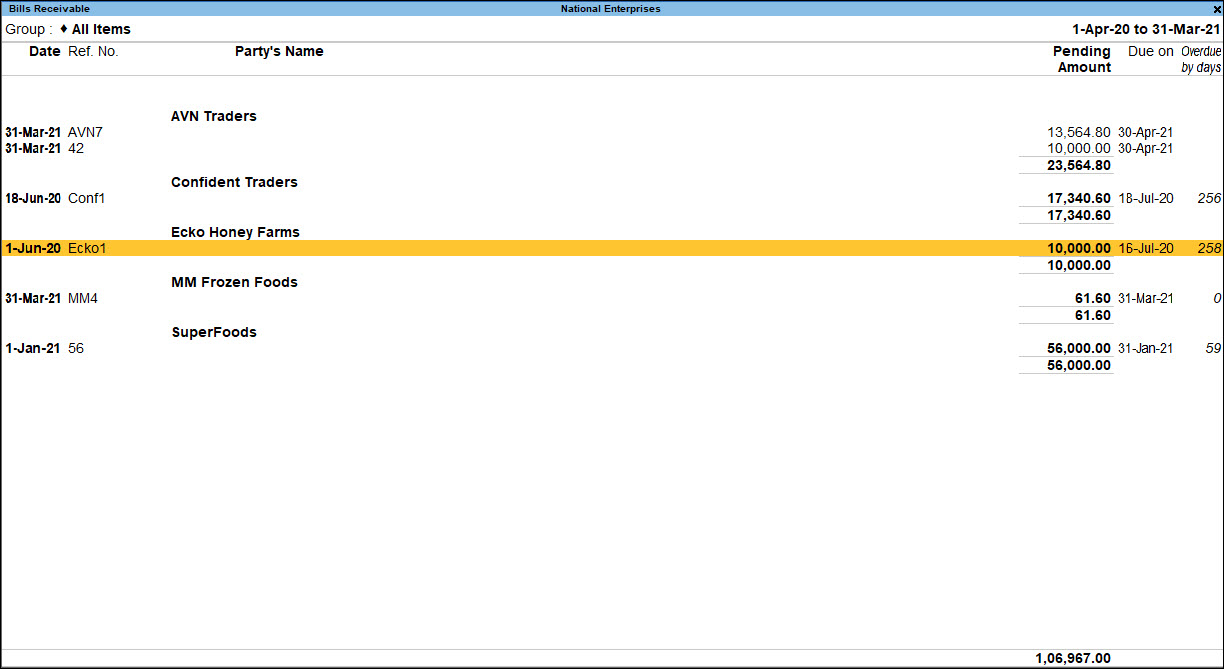
A sample image of the Bills Outstanding report is shown below.
- Pending Amount: This the amount pending from your party.
- Due on: By default, with bill-wise option enabled, the sales voucher date is considered as the due date. However, if you have specified a credit period or due days in the party master, the due date is updated accordingly once you record a sales transaction.
- Overdue by days: Based on the date of the report, TallyPrime displays the overdue days from due date, if specified earlier, or the voucher entry date.
Ledger-wise Bills:
Press F7 (Ledger-wise Bills) to view the receivables bill-by-bill for each party in the selected group.
6. Payables Report
Payables are amounts to be paid to suppliers for credit purchases.
This report helps:
-
Track pending payments
-
Manage due dates
-
Maintain supplier relationships
7. Trial Balance
Trial Balance shows:
-
Total Debit balances
-
Total Credit balances
It ensures:
Total Debit = Total Credit
It follows the double-entry accounting system.
View Trial Balance
By default, the report Trial Balance in TallyPrime will be generated as on the date of the last voucher entry. You can change the date to view the report for the required period. Let’s suppose you want to view the Trial Balance for April 2020 to March 2021,
- Press Alt+G (Go To)> type or select Trial Balance> press Enter.
Alternatively, Gateway of Tally > Display More Reports > Trial Balance.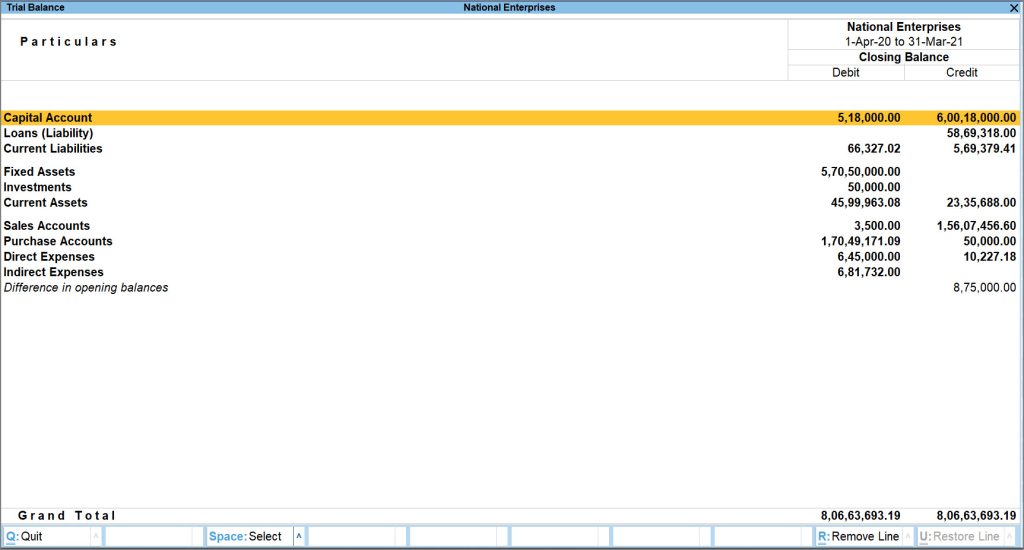
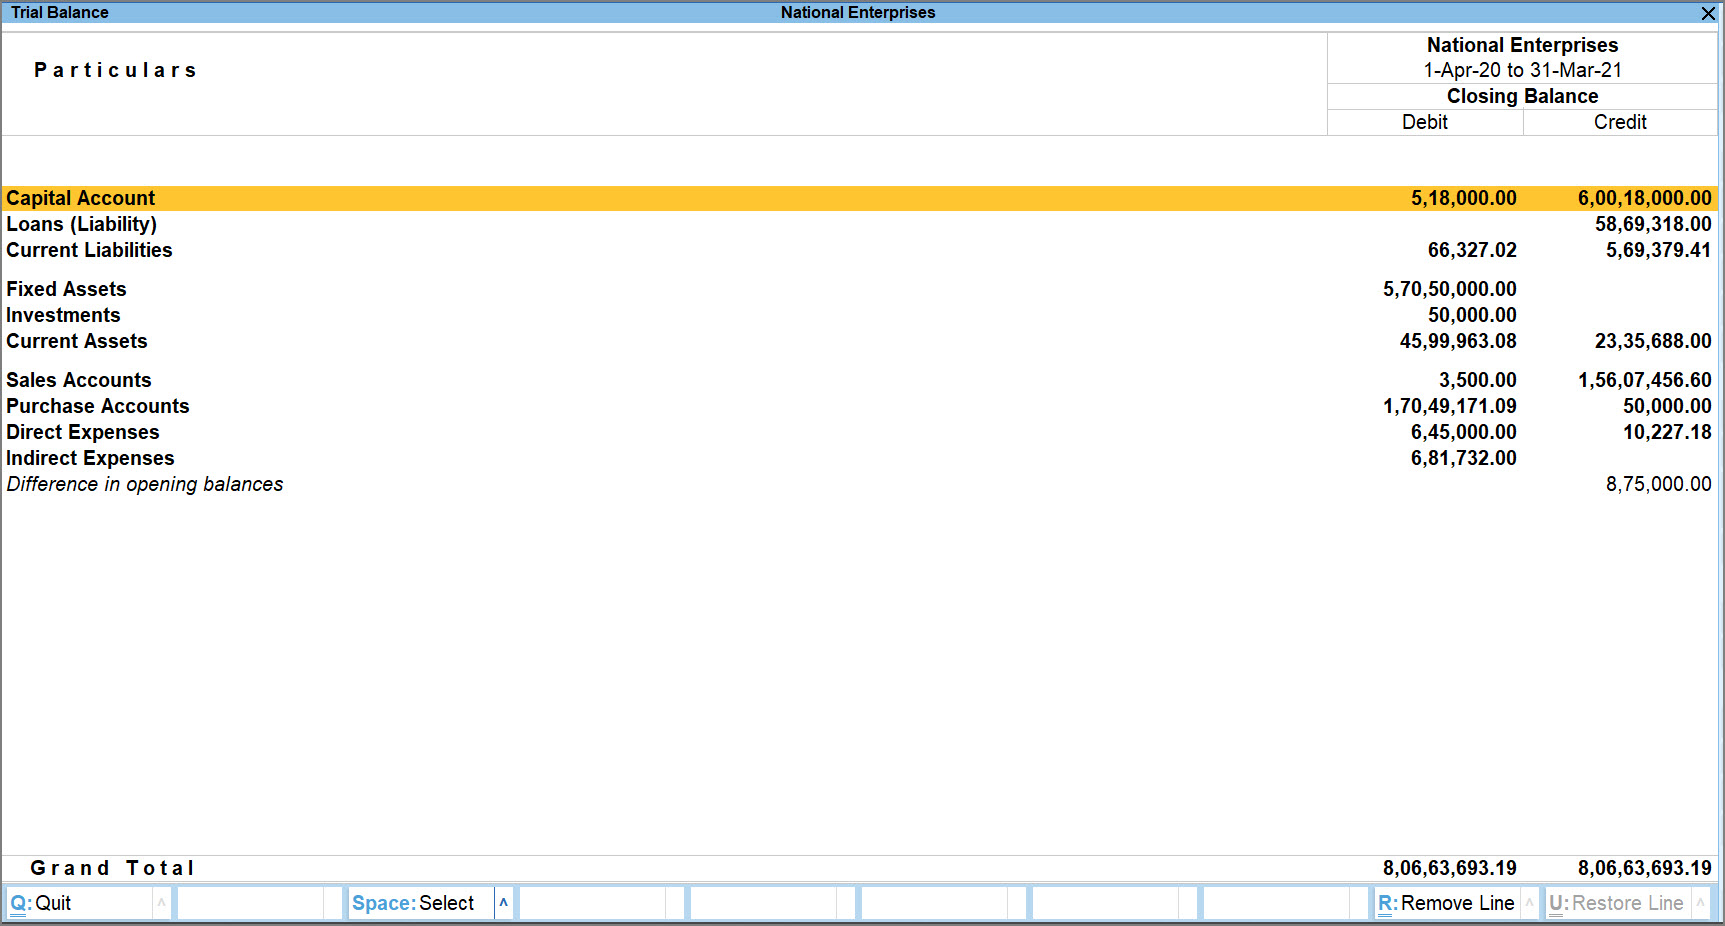
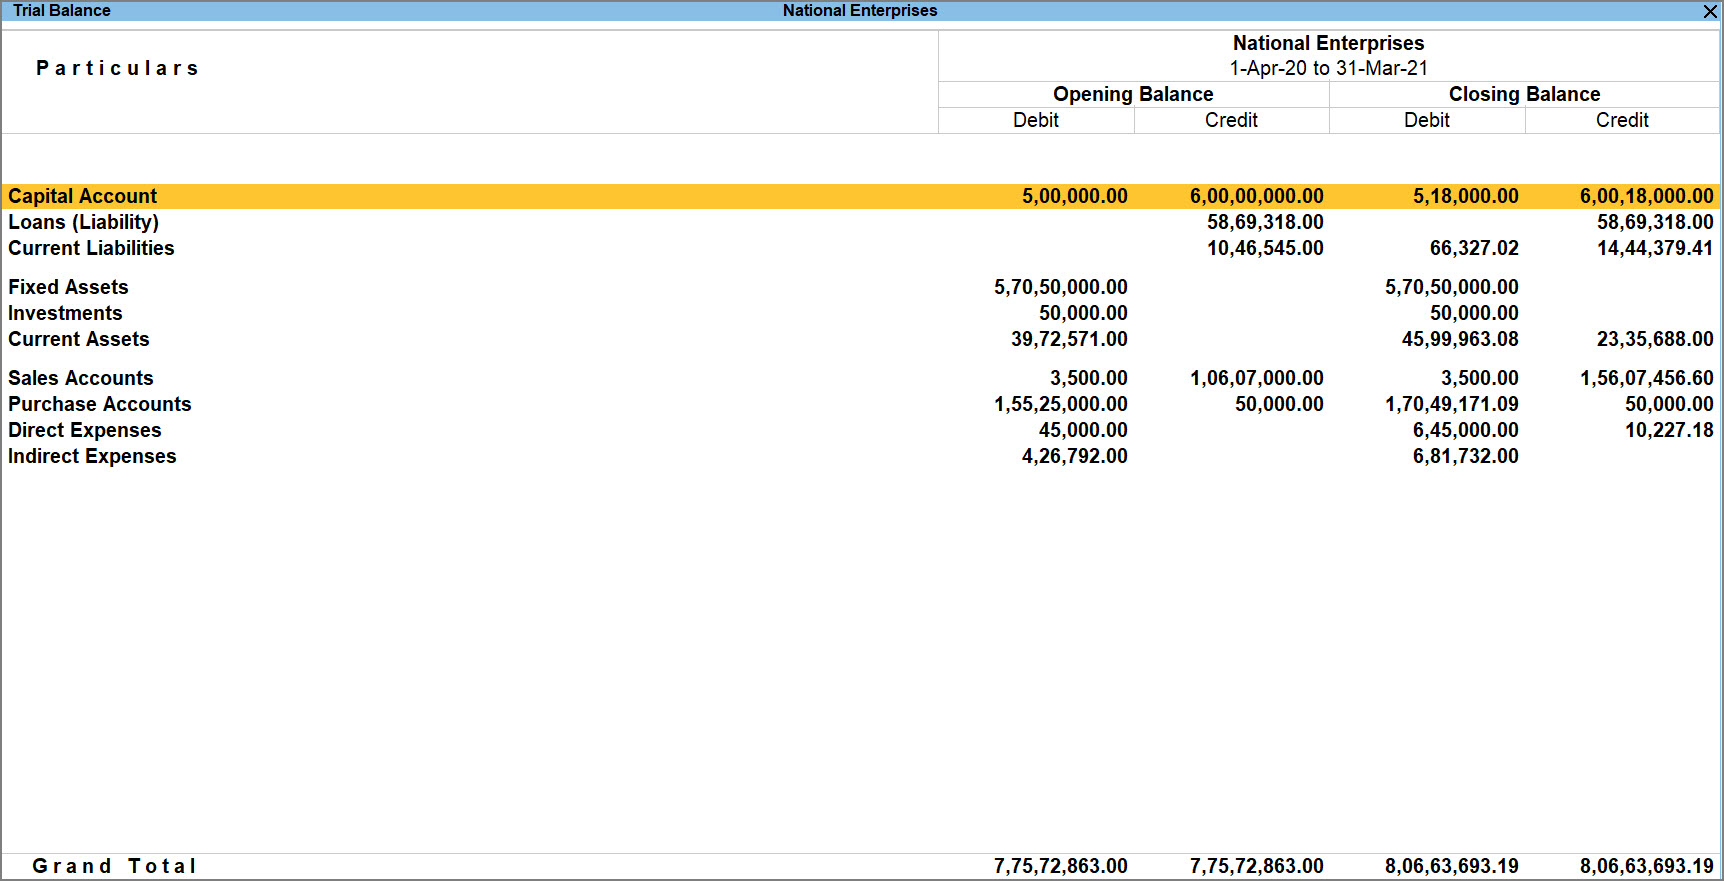
There are varied configurations in the F12 (Configure) section of the Trial Balance that allow you to view the report as per your requirements. For instance, you might want the Opening Balance of this financial year to appear in the Trial Balance report, so that you can tally it with the Closing Balance of the previous financial year. To view Opening Balance in the Trial Balance,
- In the Trial Balance, press F12 (Configure)> Show Opening Balance> Yes.
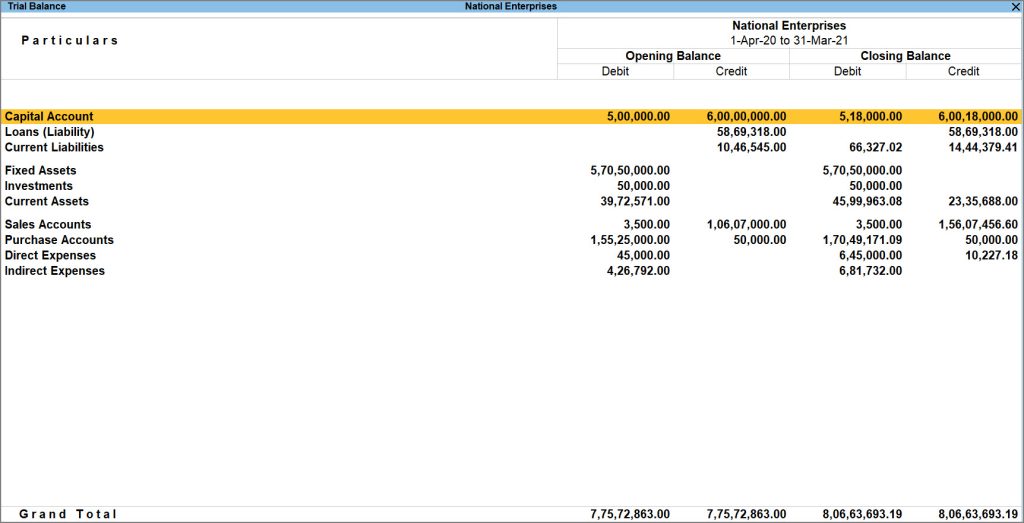
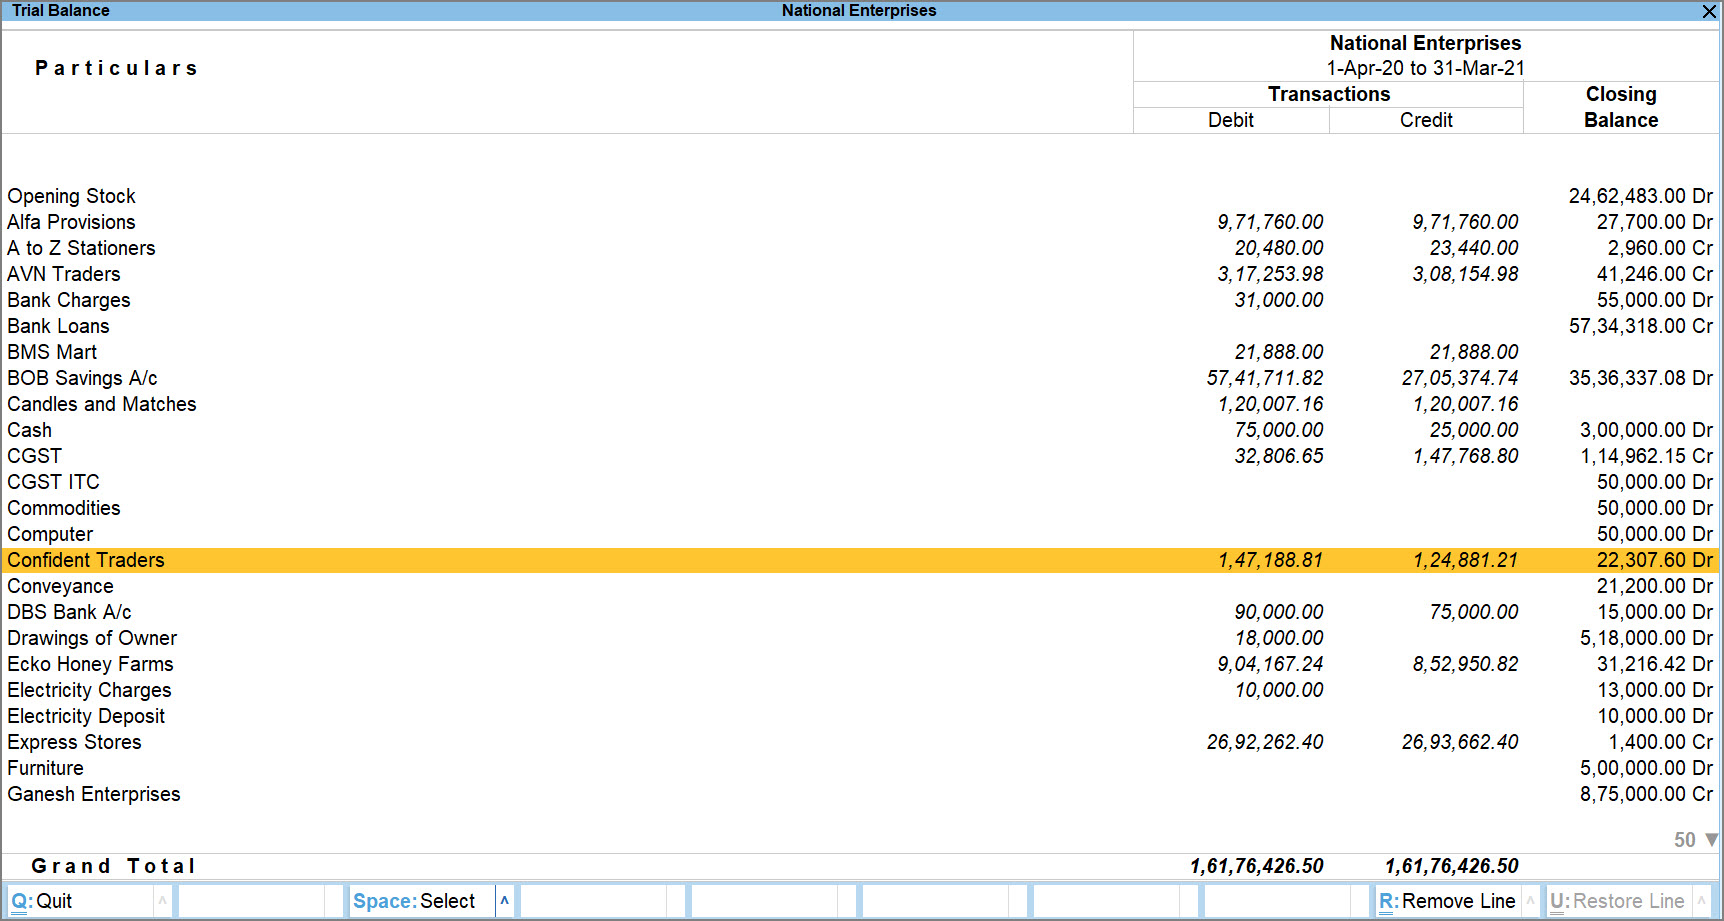
You can view the details of the Opening Balance and Closing Balance side-by-side. - Similarly, you can also view transaction details in the Trial Balance report. Let us assume that you have traded with a particular party, wherein you made purchases as well as sales with that party.
Press F12 (Configure) > set Show Transactions to Yes.
You will see the Debit as well as Credit details of the particular party.
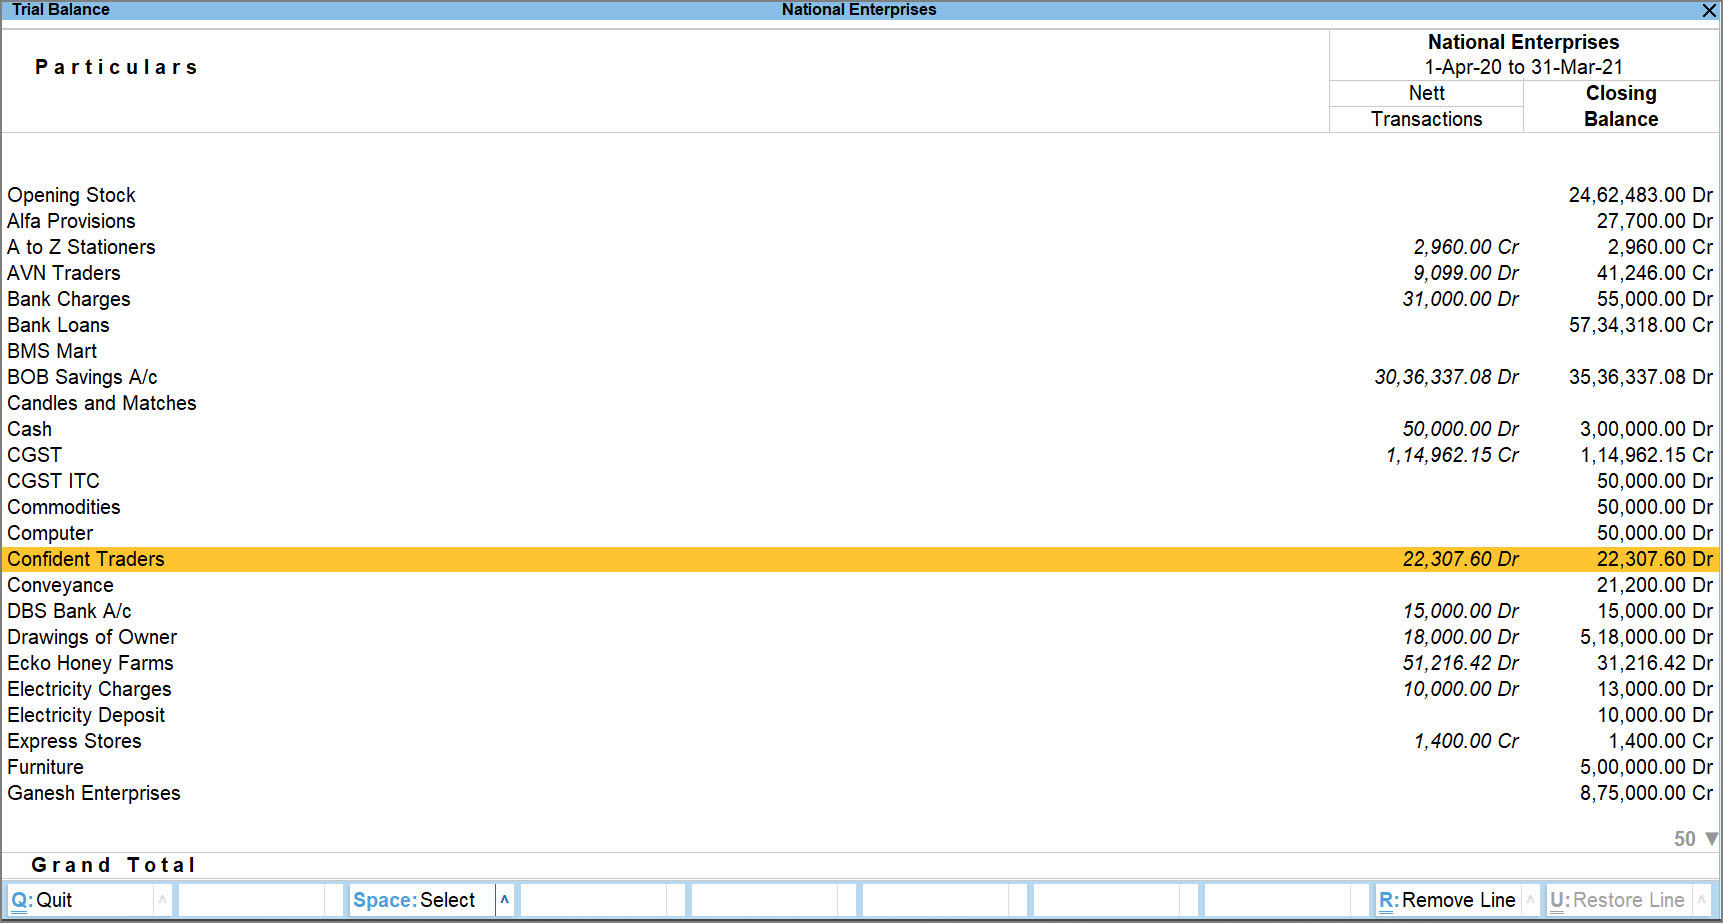
- Set the Nett Transactions to Yes to merge the debit and credit sides.
If the debit is more than the credit or vice-versa, you will be able to see a Nett amount in the Trial Balance after adjustment.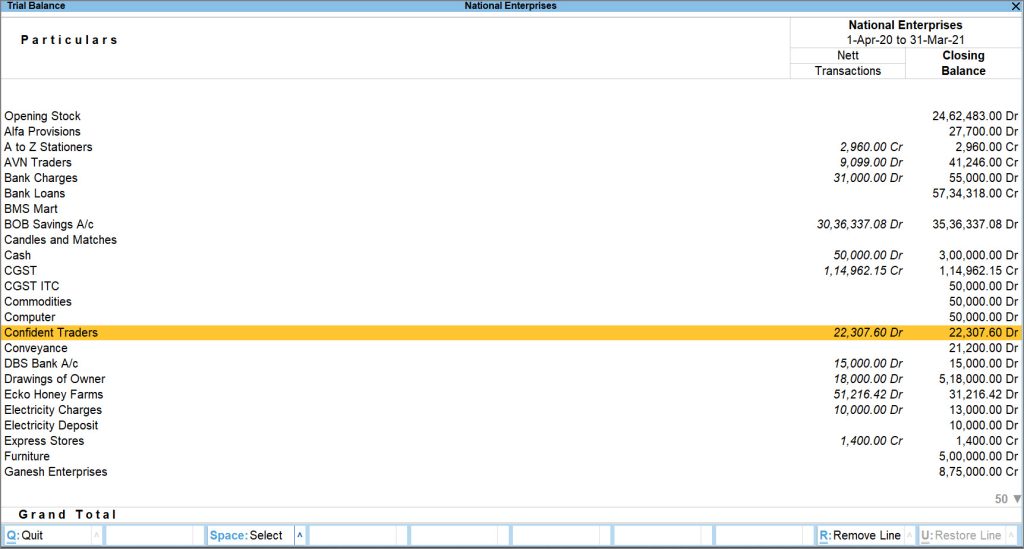
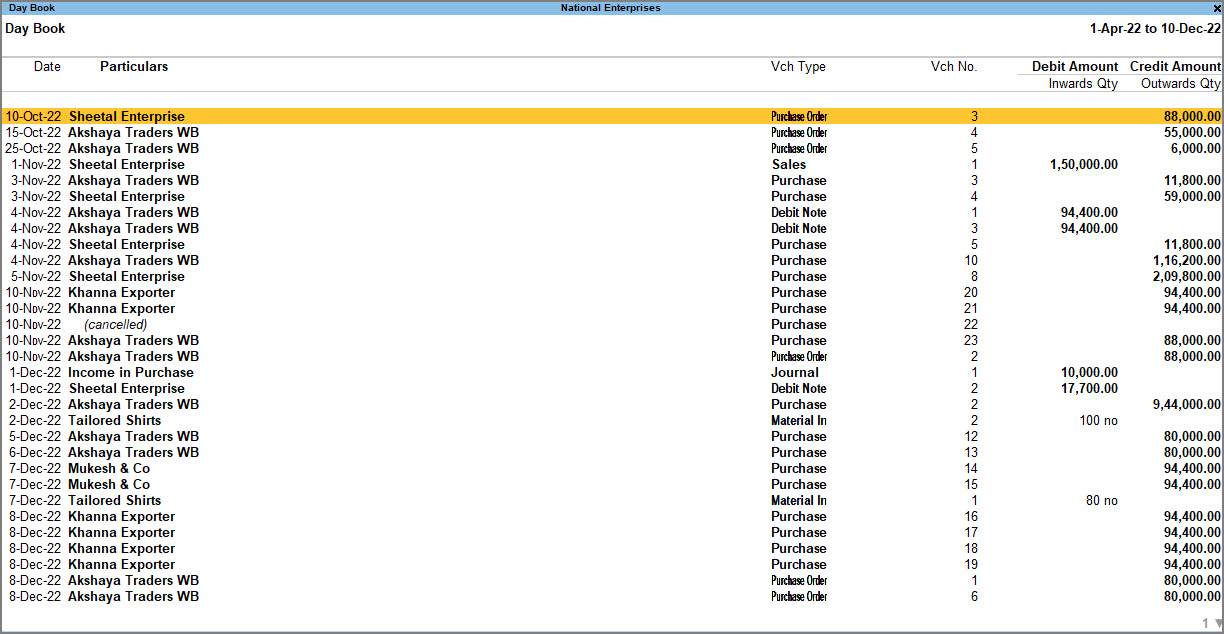
8. Day Book
Day Book records all daily transactions, including:
-
Accounting vouchers
-
Inventory vouchers
-
Reversing entries
It can be filtered for specific dates and voucher types.
View Day Book
Visit the Day Book in TallyPrime to see all your transactions that were recorded on a particular day or a period. By default, this day is set to the Current Date displayed in Gateway of Tally.
- Press Alt+G (Go To) > type or select Day Book > press Enter.
Alternatively, Gateway of Tally > Day Book.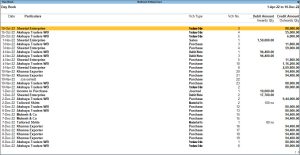
- Press Alt+F5 (Detailed) for a detailed format of the report. You can see the break-up of the invoices with details such as additional charges, tax components, and so on.

If you want to view more details of the transactions such as narration and cost centre, press F12 (Configure) and enable the configurations as required.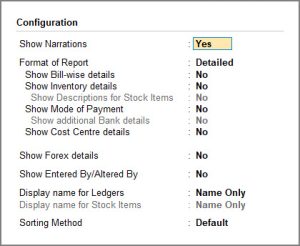
View Day Book by Type of Transaction
In the Day Book in TallyPrime, you can see not only the transactions of the day or a period but also a single kind of transaction. For example, you may want to see all the Receipts. You can easily change the view of the Day Book to see all the Receipts recorded for the day or a particular period.
- Day Book > F4 (Voucher Type), and select the Debit Note voucher type.


You can also see the Total amount from your debit notes.
Similarly, you can see all the Purchase or Sales or any voucher recorded in a day or a period.
Hide a transaction
Did you know that you can temporarily hide entries from the Day Book, without deleting it from your books?
Let us assume that you want to view the transactions for November 2022 without the purchase entries with voucher number 4 against Sheetal Enterprise because you want to prioritize and plan payments to other parties right now.
On the Day Book report,
- Press F4 (Voucher Type) > Purchase.
You can view all the purchase transactions of the day. - Select the entry against Sheetal Enterprise, and press Ctrl+R (Remove Line) to remove.
The entry against Sheetal Enterprise with voucher number 4 is now hidden from view.
Restore a removed/hidden transaction
- To restore the last entry that was hidden, press Ctrl+U. Similarly, you can keep pressing Ctrl+U to undo and the entries will be restored in the order in which they were hidden.
- To restore all the hidden entries at once, press Alt+U.
9. Accounting Registers
Registers summarize transactions by type, such as:
-
Sales Register
-
Purchase Register
-
Payment Register
-
Journal Register
They help review transaction summaries easily.
10. Ratio Analysis
Ratio Analysis compares financial data to evaluate business performance.
Common Ratios:
-
Current Ratio
-
Debt/Equity Ratio
-
Gross Profit %
-
Quick Ratio
It helps identify strengths and areas needing improvement.
- Press Alt+G (Go To) > type or select Ratio Analysis and press Enter.
Alternatively, Gateway of Tally > Ratio Analysis.
A sample image of the Ratio Analysis screen appears, as shown below: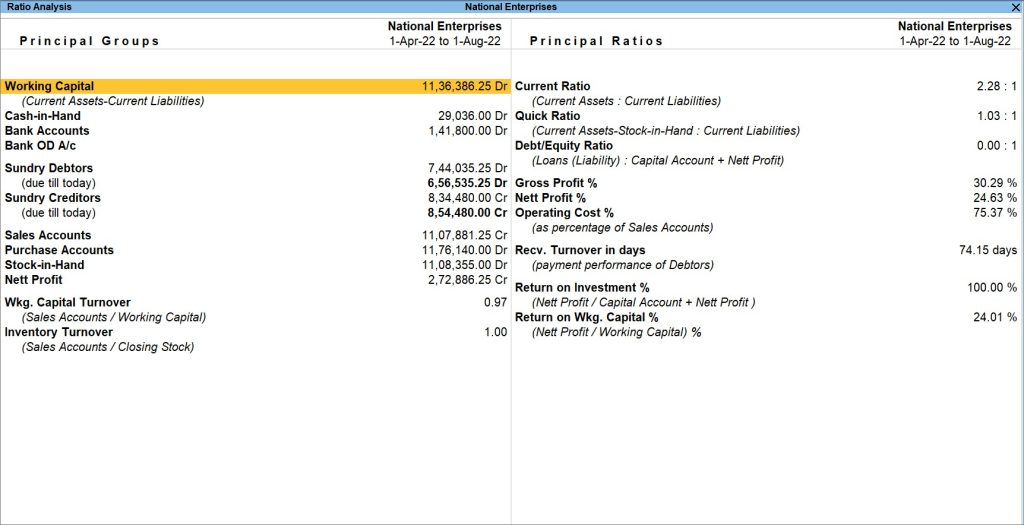
- In case you need to configure the report, press F12 (Configure).
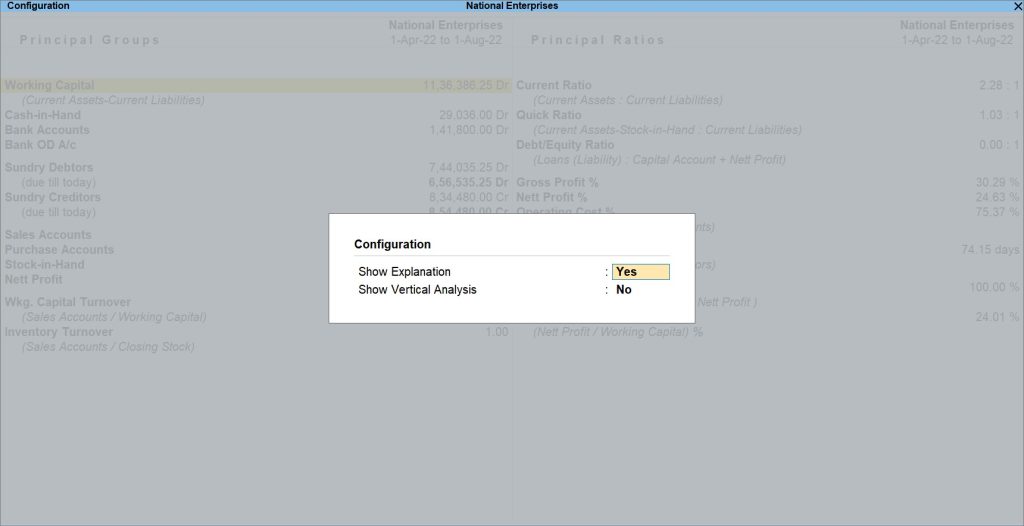
- Show Explanation: No
This option is to disable the description or explanation of the parameters mentioned in the Principal Groups and Principal Ratios. By default, this option is set to Yes. The descriptions are meant to give you a better understanding about the parameters and how they are calculated.
For example, Working Capital is the difference between your Current Assets and Current Liabilities. Similarly, the term Current Ratio depicts the ratio between the Current Assets and Current liabilities and Quick Ratio.
However, you can set this option to either Yes or No, according to your convenience. Once you have set the Show Explanation to No, a sample image of the Ratio Analysis report appears, as shown below: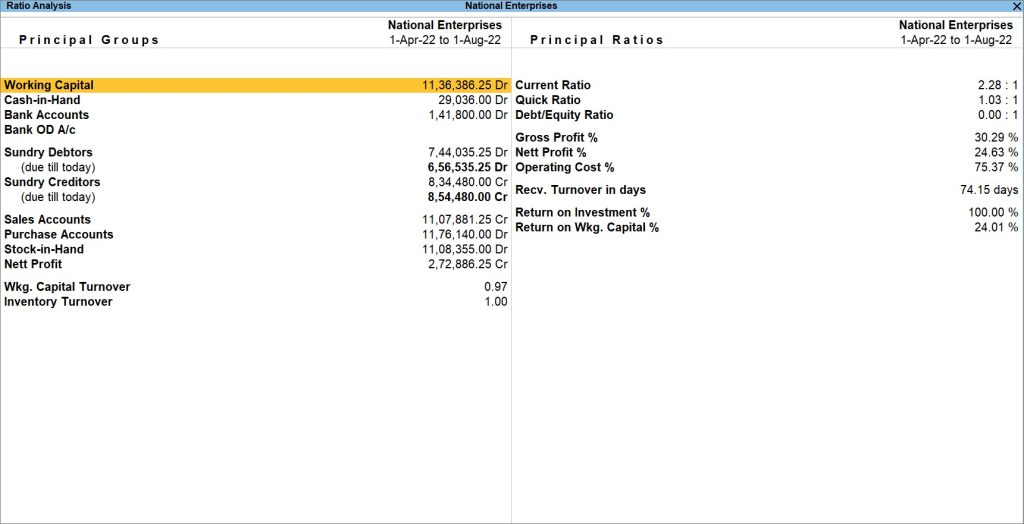
- Show Vertical Analysis: Yes
This option is to view the Ratio Analysis report vertically. In the Ratio Analysis report, Principal Groups and Principal Ratios appear horizontally by default.
However, if you want to change the view to vertical and represent the data vertically, you can do so by changing this option to Yes.
Once you have set the Show Vertical Analysis to Yes, you can view the Ratio Analysis report, as shown below: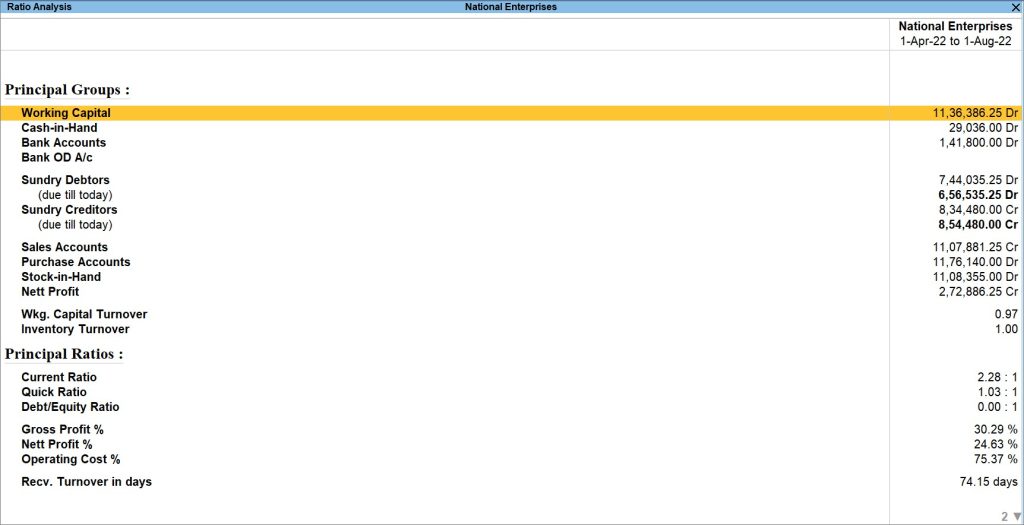
- Show Explanation: No
11. Cash Book
Cash Book records all cash receipts and cash payments.
12. Bank Book
Bank Book records all bank transactions including receipts and payments.
- Press Alt+G (Go To) > type or search Cash/Bank Book > press Enter.
Alternatively, Gateway of Tally > Display More Reports > Account Books > Cash/Bank Book(s).
The Cash/Bank Summary screen appears, displaying the Cash and Bank transactions of your company. - Select the Cash ledger. Press Alt+F2 to select the required period, and drill down to view the ledger vouchers.
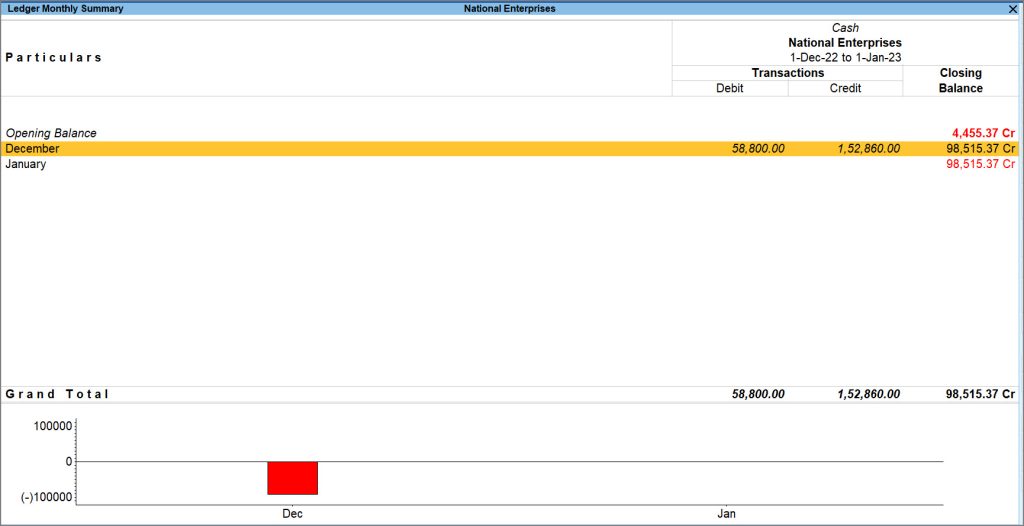
The Ledger Monthly Summary screen displays the Debit and Credit amounts of all the vouchers for the period. The cash balance might be negative on varied days. In this case, TallyPrime displays the credit cash balance in Red as the Closing Balance.
Similarly, with the Bank Book in TallyPrime, you can view all the bank-related receipts and payments in one place. For instance, if you want to view the banking transactions made during January,
- In the Cash/Bank Summary Screen, select the required Bank from the list of Bank Accounts.
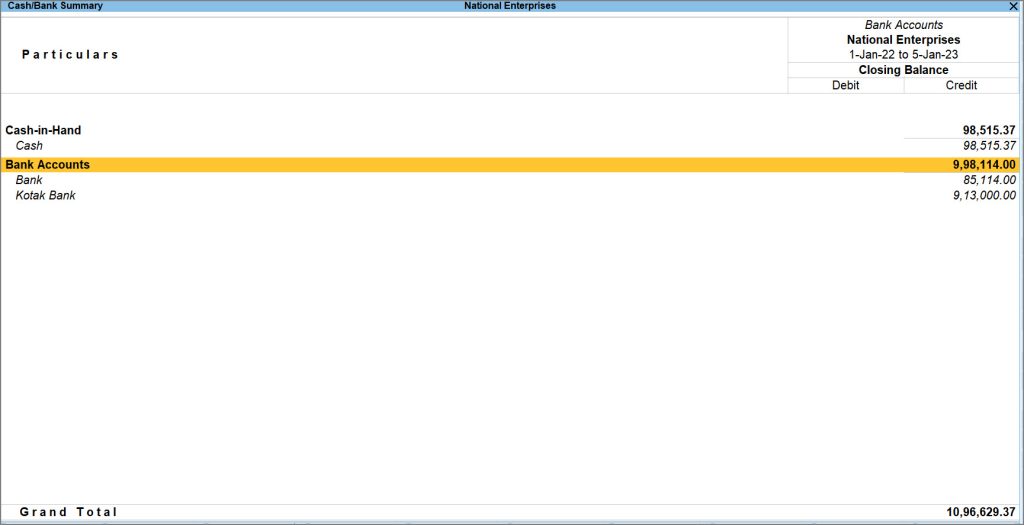
- If you have more than one bank account, select the required account and drill down to view the Ledger Monthly Summary.
If you want to know what amount is left in your account at the end of a given period, you can set the Show Closing Balance options to Yes in F12 (Configuration). This will display the Closing Balance of your company and help you track the company’s finances. 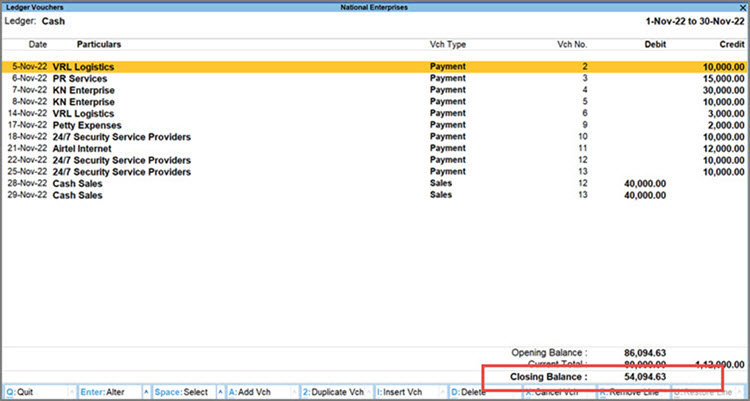
13. Statistics Report
View Statistics Report
The Statistics Report provides you with detailed information about the types of vouchers and accounts involved in your business transactions for a particular period. By default, you can view the statistics side by side in a columnar format.
In this section
- View default report
- Vertical statistics
- Sort by default vouchers
- Vouchers with zero entries
- Press Alt+G (Go To) > type or select Statistics > and press Enter.
Alternatively, Gateway of Tally > Display More Reports > Statement of Accounts > Statistics.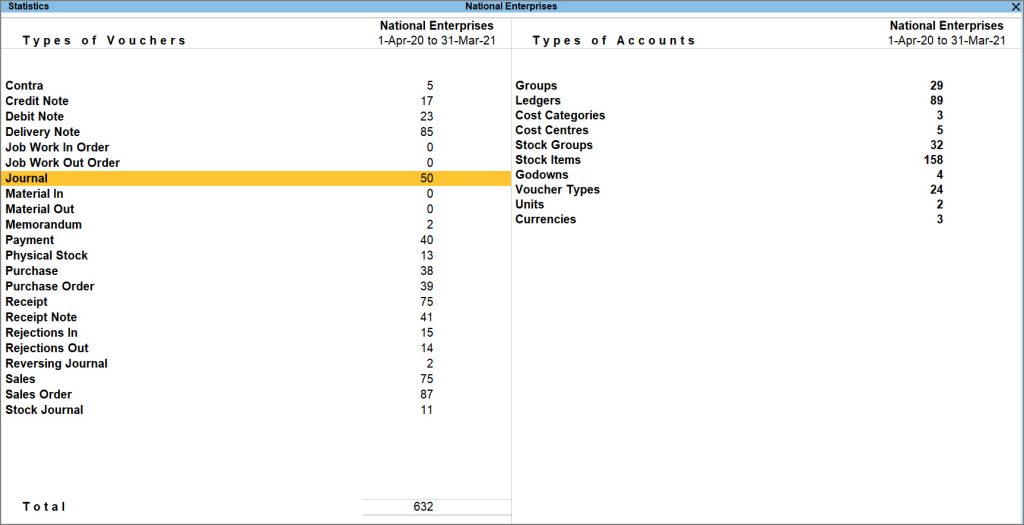
- Drill down a specific type of voucher to view the details. For example, you can select Journal as Type of Vouchers and press Enter. The Voucher Monthly Register screen appears as shown below:
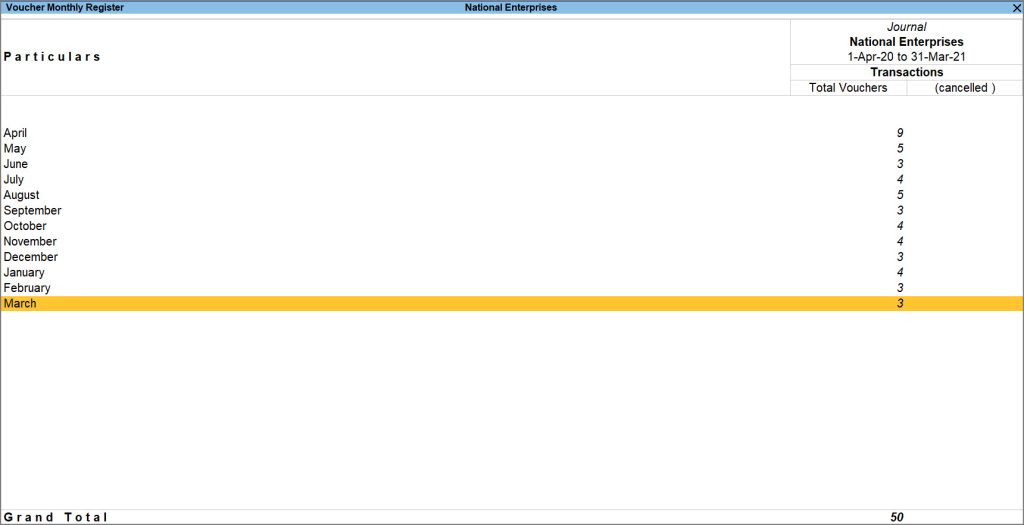
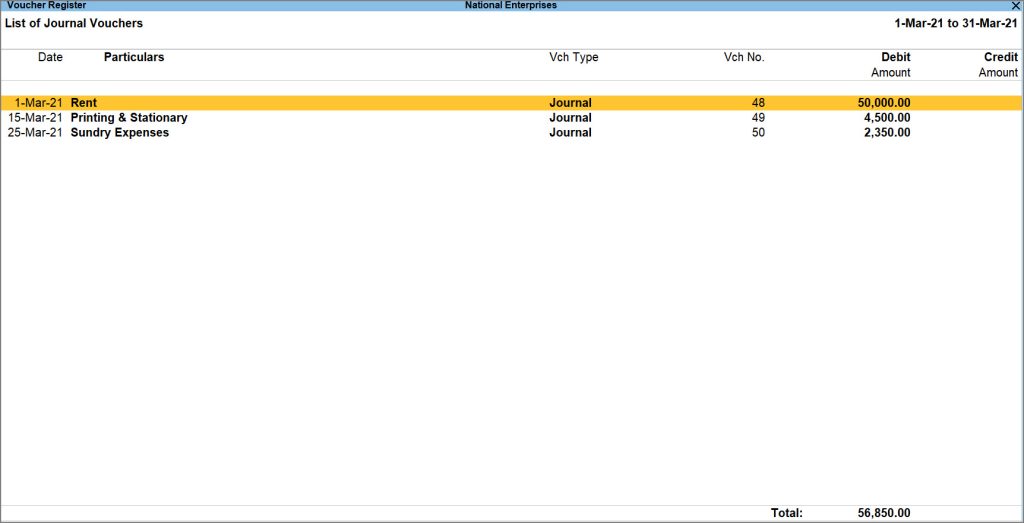
- Drill down from the required month for more details, such as Voucher Numbers, Invoice Amounts, and the Total Amount.
14. Print Multi Account Reports
TallyPrime allows printing multiple reports at once, such as:
-
Cash Book
-
Bank Book
-
Ledgers
-
Sales & Purchase Registers
Access Multi Account Reports
- Press Alt+P (Print) > Others.
- Select Show More > and press Enter to view all the reports supported for multi account printing.
Note: The Multi Account Reports will not appear if you are working on Educational Mode. Ensure that your TallyPrime license is active to access these reports.
- Select the required report and press Enter, and then print the required reports.
Print, Export, E-mail All Accounts
Note: For illustration purpose, print related procedure and images have been used in this section.
- Press Alt+P (Print) > Others.
- In the list of Multi Account Reports, select All Ledger Accounts > and press Enter.
- In the Print sub-screen, press C (Configure), and provide the period. Based on the report selected, the options appear.
- You can select Show More and press Enter, to view all the options provided for the selected report. Set the options as needed.
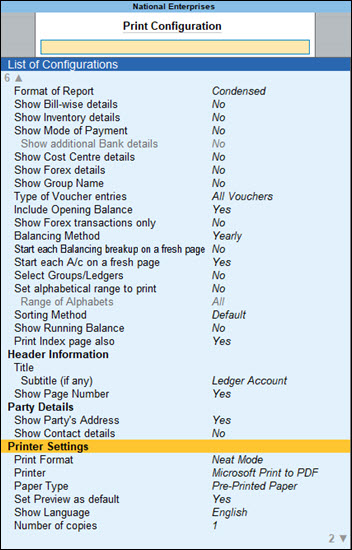
- Press Esc > press I (Preview) to preview it or press P (Print) to print.
This saves time and improves efficiency.